The Myth Of The Beginner Friendly Kit Why Easy Is A Lie

Kits Hide The Real Design Decisions
You want to skip the learning curve because you think it wastes time, but here’s what actually happens: pre-assembled kits bundle mismatched components and call it simplicity. The manufacturer chooses a cheap tweeter, a mediocre woofer, and a crossover that barely works together, then packages it with “just add a box” instructions. You build the enclosure correctly and blame yourself when it sounds thin or boomy. The kit wasn’t beginner-friendly. It was design-agnostic.
The real problem is that every component choice changes how others perform. A soft dome tweeter demands a different crossover slope than a hard dome. Cabinet volume affects woofer resonance. Port tuning shifts frequency response across the entire range. Kits force a fixed combination and eliminate the one thing beginners actually need: visibility into why each piece matters. You’re not learning to build speakers. You’re learning to follow directions.
Component Synergy Is The Whole Game
Treat speaker design like acoustical engineering, because it is. A single term matters here: acoustic impedance mismatch. It’s when energy fails to transfer efficiently between materials or systems. In DIY speakers, this happens when you pair a tweeter with a woofer using a crossover that doesn’t account for their different impedance curves across the frequency range. The crossover is the translator between two parts that naturally resist working together.
Understanding synergy means measuring how components interact before assembly, not after. A tweeter specification sheet shows sensitivity in dB/1W/1m, but you need to know if that tweeter’s impedance rises or falls above its designed crossover frequency. A woofer’s Thiele Small parameters tell you the box volume it needs, but not whether your chosen midwoofer pairs well with your tweeter’s frequency response curve. You learn this by studying component datasheets side by side, cross-referencing crossover designs, and building test enclosures to verify predictions. That work is unavoidable if you want results that don’t sound like a kit.
Beyond MDF: Choosing Materials For Resonant Sound (Not Just Budget)

How Enclosure Materials Shape Frequency Response
You want to believe material choice doesn’t matter that much because it keeps the project cheap and simple. It does matter. The enclosure isn’t a box that holds drivers. It’s a mechanical filter that controls how cabinet walls vibrate at different frequencies, which directly shapes what you hear. Thicker, denser materials damp high-frequency vibrations. Lighter materials resonate at specific frequencies and color the midrange. This is basic mechanical engineering: mass and stiffness determine resonant modes.

MDF dominates DIY speaker building because it’s inexpensive and moderately damped, not because it’s ideal. Solid wood panels vibrate differently than MDF at identical thicknesses. Plywood introduces internal damping through its laminated structure. Birch plywood resonates higher than pine. These aren’t subtle differences if you’re listening critically. The material you choose determines which frequencies your enclosure absorbs versus amplifies before the signal even reaches your ears.
Spend Here, Compromise There
Front baffle material demands your attention and money. Bracing materials demand your attention and money. Internal damping demands your attention and money. Cabinet sides and backs demand neither.
- Front baffle (1.5 inches minimum): Use solid wood or thick plywood here. This surface vibrates directly behind your drivers and colors midrange tone severely if it’s thin or resonant. Birch plywood outperforms MDF at the same thickness.
- Internal bracing: Hardwood cross braces (oak, maple) outperform MDF bracing for stiffness-to-weight ratio. The goal is eliminating cabinet flex, not saving three dollars. Cheap bracing defeats expensive drivers.
- Damping material (fiberglass, rockwool, sheep’s wool): Buy quality acoustic foam or mineral wool. Thin, low-density damping is wasted money. One-inch rockwool at 2.5 pounds per cubic foot works. Cheaper alternatives compress and lose effectiveness within months.
- Cabinet sides and back panels (0.75 inches): Standard MDF works here. These surfaces contribute less to coloration. Your budget constraint won’t degrade sound meaningfully if the baffle and bracing are solid.
- Fasteners and joint technique: Use wood glue on all joints, then mechanical fasteners. Pocket hole joinery (Kreg jig) provides clamping pressure. Screws alone allow micro-movement that degrades rigidity and introduces panel resonance.
The real trade-off is time and labor, not material cost. A properly braced MDF cabinet with a solid wood baffle costs fifty percent more than pure MDF but sounds thirty percent better. Skipping bracing entirely saves money and tanks sound. Skip the back panel finish instead. Stack your priorities where they produce audible results.
The Transducer Truth: Drivers Are More Than Just Magnets

What Woofers And Tweeters Actually Do
You want permission to buy expensive drivers because you think better parts equal better sound. That’s wrong. The real mechanism is impedance matching and frequency division. A driver is a transducer that converts electrical energy into mechanical motion. In audio engineering, we call this the electromechanical conversion problem. Your woofer and tweeter each solve it differently because they operate in opposite frequency ranges.

A woofer moves slow and heavy to push air at low frequencies. A tweeter vibrates fast and light to produce high frequencies. Neither alone covers the audible spectrum. The cone material, surround type, and voice coil resistance determine how each driver responds to the power sent its way. Cheap drivers use thinner cones and weak surrounds that lose stiffness quickly. Better drivers maintain linear motion across their operating range.
Matching Drivers For Balanced Output
The problem nobody states plainly: mismatched drivers create frequency response valleys that no EQ fixes. Matching drivers means their efficiency ratings should be within 2 to 3 decibels of each other, and their impedance curves should complement rather than fight. When a woofer’s resonant frequency and a tweeter’s crossover point don’t align, you get a hole in the frequency response where they handoff.
Start by choosing drivers from the same manufacturer or product line. They’re voiced to work together. If you mix a high-efficiency woofer with a low-efficiency tweeter, your crossover will need attenuation padding on the tweeter to balance output levels. Calculate SPL output at your crossover frequency for both drivers. Match them at 85 decibels or higher. Then measure the combined response with a frequency sweep and adjust the crossover point if peaks or dips exceed 3 decibels.
Crossover Confusion: The Brain Of Your DIY 2 Way Bookshelf Speakers

What A Crossover Actually Does
You want the crossover to be invisible because you’re afraid you’ll mess it up and waste money on drivers that won’t play nice together. Here’s the mechanism: a crossover is a filter that splits an audio signal into frequency ranges, sending bass to the woofer and treble to the tweeter. Nothing mystical. It’s pure electrical separation.

Think of it like signal routing in telecommunications. A telephone line carries multiple conversations simultaneously by dividing them into different frequency bands, each traveling independently without interfering with the other. Your crossover does the same thing. It prevents the woofer from trying to reproduce high frequencies it can’t handle cleanly and stops the tweeter from attempting bass it’ll only distort. The crossover point, called the crossover frequency, is where the handoff happens. Most 2-way designs sit between 2kHz and 4kHz because human ears are sensitive there and the math works.
Matching Drivers With The Right Crossover Design
The common advice says “just buy a predesigned crossover online.” That’s incomplete. Driver impedance, sensitivity, and mechanical response all demand different crossover slopes and component values, or the transition between drivers sounds like someone flipped a switch in the middle of the song. Borrowing from acoustical engineering, impedance matching in speakers works like impedance matching in transmission lines: mismatches cause reflections and phase cancellations that degrade performance.
Your tweeter and woofer have different impedance curves across the frequency spectrum. A first-order crossover (6 decibels per octave slope) lets drivers blend more gradually but demands careful driver selection. Second-order designs (12 dB per octave) provide sharper separation and forgive more driver mismatches. If your tweeter peaks at 5kHz and your woofer has a rising response in that same zone, the crossover must account for that or you’ll hear a peak in the transition band. Build a simple crossover first: use measured driver data, calculate component values using standard formulas, then listen and measure. Adjust capacitor or inductor values in small steps until the frequency response flattens through the crossover region.
Enclosure Alchemy: Bass Reflex Bookshelf Speaker Plans Unveiled
The Tuning Frequency That Kills Bloat
You want bass that hits without sounding like someone stuffed your speakers with pillows. That’s the real reason you’re reading this section. Bass reflex design uses acoustics—specifically the principle of acoustic resonance—to amplify low frequencies at a chosen point, then control them. The port you design acts like a pressure release valve tuned to a specific frequency where the cabinet’s air mass and spring stiffness align.

Most DIY guides say “just calculate Fb.” Wrong. Fb is only the starting point. Your actual tuned frequency depends on port diameter, port length, cabinet volume, and driver parameters working together. A 1-inch port 4 inches long in a 0.75-cubic-foot cabinet produces different results than a 1.5-inch port 2.5 inches long in the same box. Use WinISD or similar software to model the response curve before cutting anything. Test your math against real driver specs, not generic assumptions.
Cabinet Stiffness And Wave Control
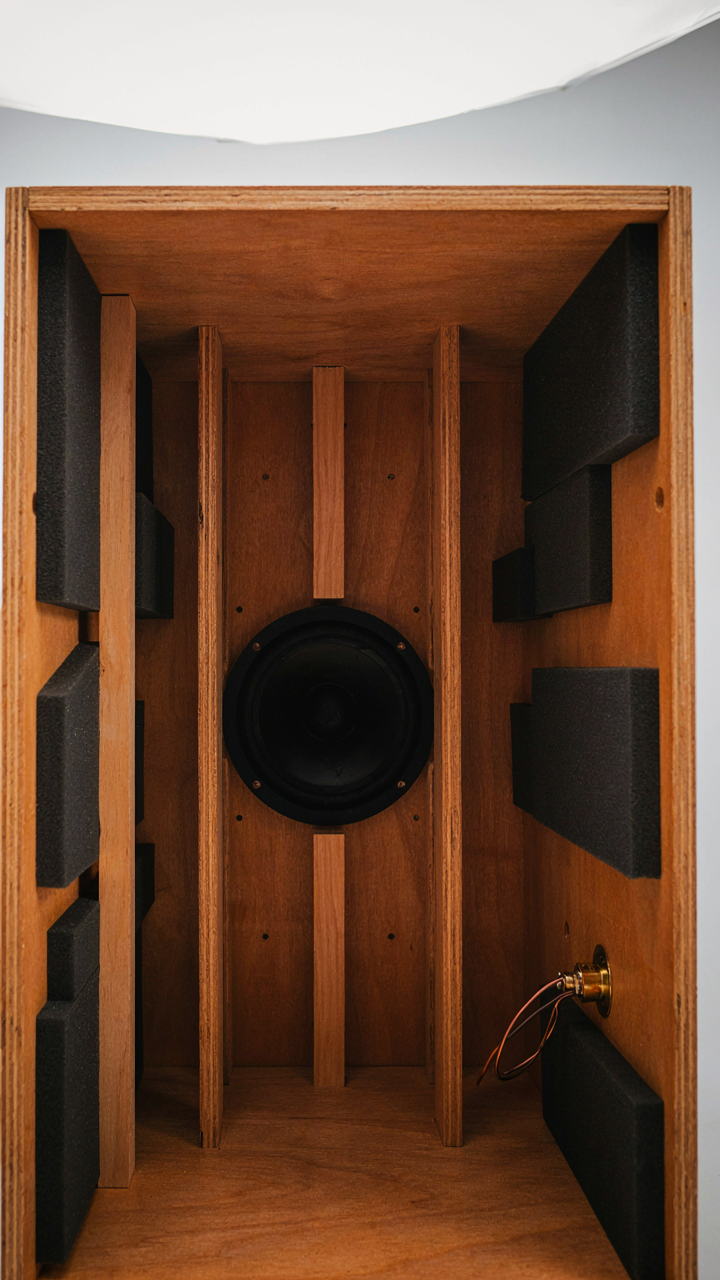
Internal bracing stops the cabinet walls from vibrating like a drum head, which ruins clarity and muddies everything below 200 Hz. Treat the interior structure like a load-bearing architecture problem—cross-bracing converts a hollow box into a rigid frame that doesn’t color the sound. The mechanism is simple: vibrating walls create secondary sound sources that interfere with what the driver produces.
Add 1×2 or 1×3 bracing between front and back panels, positioned at angles or perpendicular to the longest span. Damping material absorbs energy but doesn’t stop resonance—bracing does. Use 2-3 inches of acoustic foam or fiberglass on internal surfaces, but place it away from bracing so air can flow. Position damping densest near port openings and driver surrounds where pressure peaks. The protocol: brace first, then dampen.
The Acoustic Environment: Why Your Room Is Part Of The Speaker

How Sound Bounces Off Everything
You want your speakers to sound expensive without spending like it. The truth is simpler: most people blame the speaker when they should blame the room. Acoustics is the physics of wave propagation, and your DIY bookshelf speaker is just the initiator, not the final voice. The room finishes the equation.

Sound doesn’t vanish after it leaves the speaker. It travels outward, hits walls, bounces back, and interferes with itself. Hard surfaces like drywall, glass, and hardwood reflect sound waves almost completely. Soft materials like curtains, carpet, and foam absorb them. Your ear receives direct sound from the speaker plus reflections arriving milliseconds later. This creates comb filtering, where certain frequencies cancel out while others amplify. The room is doing as much work as your tweeter.
Speaker Placement For Accurate Imaging
Put the tweeters at ear level when you sit. This isn’t decoration advice, it’s geometry. Your ear is a directional sensor. When the tweeter sits above or below ear level, you hear the high frequencies as coming from a different point in space than the midrange. This kills the illusion that sound originates from a single, cohesive image on your soundstage.
Distance from walls matters more than people admit. Placing a speaker six inches from the rear wall exaggerates bass response by up to 6 decibels due to the boundary effect. Move it three feet out, and that coloration disappears. Start with speakers at least two feet from the wall behind them and one foot from side walls. Then listen and adjust. The goal is neutral response, which means the speaker shouldn’t add character based on its location alone.
The Iteration Protocol: Learning From Failure, Not Forums

Build, Listen, Measure, Adjust
You want permission to skip the trial-and-error phase. You don’t get it. Product design borrowed a principle from manufacturing called rapid iteration: you make something, test it against reality, identify what failed, and change one variable. Apply this directly to speaker building. Most beginners assemble a box, wire drivers, and expect results. That’s not iteration. That’s assembly.

Real iteration means building a prototype intentionally rough, listening to it in your room, identifying one specific problem (boomy bass, harsh treble, weak midrange), and changing one component or tuning parameter. Then you listen again. Document what shifted. This compresses learning from months into weeks because you’re training your ears against your own acoustic environment, not chasing forum consensus about what speakers should sound like in someone else’s living room.
The Troubleshooting Map
Common advice says “use your ears” or “compare to reference speakers.” That’s incomplete. Systematic troubleshooting means isolating variables in order: driver placement, cabinet damping, crossover settings, then room acoustics. Don’t change three things and wonder what worked. Change one. Listen. Take notes on what you heard. Move to the next variable only after documenting the result.
Start with driver performance in isolation. Place your prototype in the center of your room, away from walls. Listen for peaks and dips. If you hear boom below 100Hz, the cabinet is probably resonating or the driver is overhyped by the room mode. If upper midrange sounds harsh, the tweeter crossover point needs adjustment or damping material is insufficient inside the box. Each problem has a mechanical cause.
Finishing Touches: Aesthetics That Don’t Compromise Acoustics
Veneer Application And Cabinet Damping
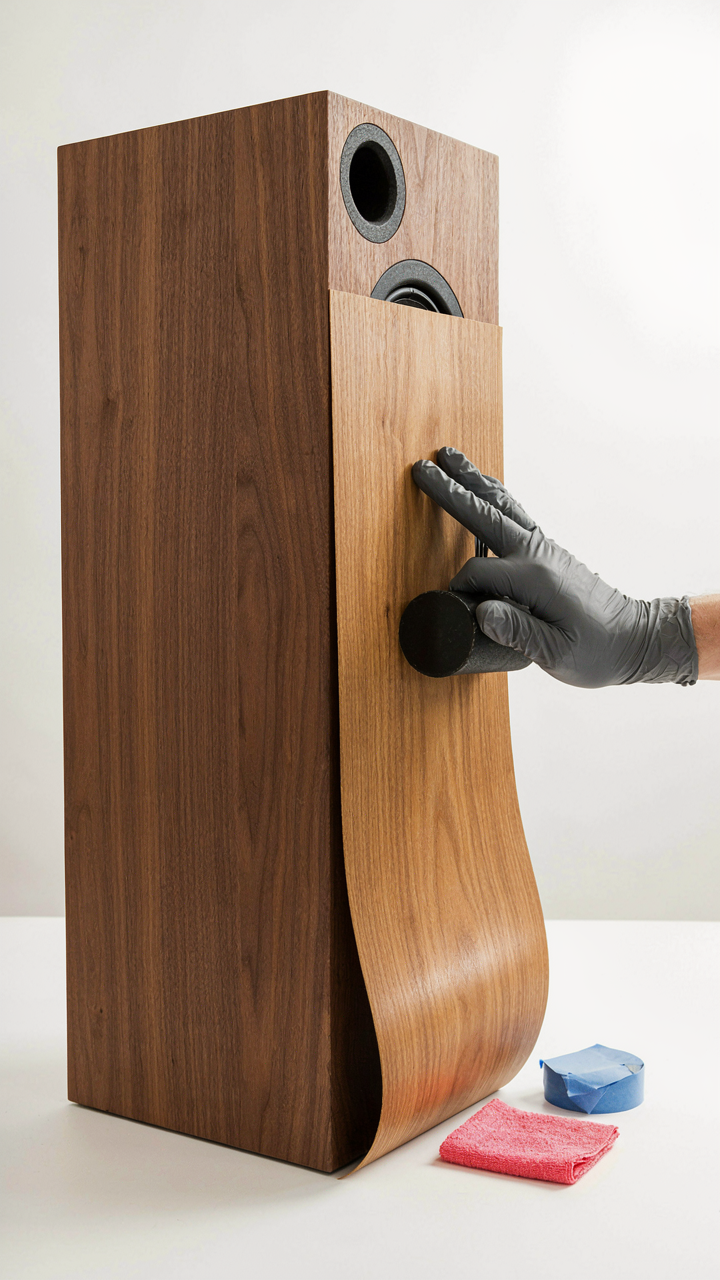
You want your speakers to look finished because unfinished plywood reads as unfinished work, and you’re afraid people will assume you cut corners on the internals too. The real mechanism is this: veneer seals the cabinet, and sealed cabinets damp panel vibration. That matters acoustically.

Veneer doesn’t just cover wood. It adds mass to cabinet walls, which raises the resonant frequency of panel vibration above the midrange where your ear detects it most. Apply veneer with contact cement or PVA glue, working in sections. Press firmly to eliminate air pockets. Sand after curing with 120 grit, then 220 grit. Uneven pressure creates hollow spots that vibrate independently and muddy the midrange.
The common advice says veneer is cosmetic. It’s not. Veneer is acoustic treatment dressed as decoration. Thicker veneers (1/32 inch or more) damp better than paper-thin varieties. You can measure the difference with a simple tap test: an unveneered cabinet rings longer than a veneered one. That ringing is distortion leaking into your music.
Grille Design And Frequency Response Trade Offs
Grilles work like acoustic filters, which is physics language for saying they absorb certain frequencies before sound reaches your ear. Understand this: a grille attenuates high frequencies more than low frequencies. That’s not opinion, that’s how wave diffraction works at different wavelengths.
Most DIY builders avoid grilles because they think grilles “color the sound.” They do. But so does every other decision you’ve already made. The question isn’t whether a grille changes frequency response. The question is whether those changes matter to you. A tightly woven grille absorbs 2-4 dB in the presence peak around 3-5 kHz. A loose weave or frame-only design loses that absorption. Tight weave grilles sound warmer. Loose designs sound more detailed in that region. Pick whichever sonic character matches your music.
Grille construction determines how much diffraction happens. Acoustic cloth stapled to a wooden frame behaves differently than perforated metal or plastic mesh. Perforated metal creates less absorption because sound passes through larger openings. If you want minimal coloration, use an open frame or perforated material with hole diameters above 3mm. Measure your final frequency response with a microphone and tone generator to confirm the grille’s actual impact on your specific cabinet.

The Unseen Costs: Time, Tools, And Trade Offs

What Your Component Budget Actually Covers
You’re hoping the math works out so building speakers costs less than buying them. That’s not the real problem you’re solving. The real problem is you want to believe this is cheaper, when the actual mechanism at work is time-to-completion arbitrage: you’re trading hourly labor for component savings. A tweeter costs fifteen dollars. Your labor assembling the crossover costs you three hours minimum. Do the math against retail speakers in your price range and the gap narrows fast.
Most guides tell you to budget for drivers, crossover parts, and cabinet wood. That’s incomplete. Add cabinet hardware, internal bracing material, damping compound, adhesives rated for wood joints that won’t fail, finish materials, and replacement components when you get the first attempt wrong. A realistic component budget includes a failure margin of twenty to thirty percent. If you budget three hundred dollars for parts, expect to spend four hundred before you have a working pair.
The Tools Question Determines Everything
Economics borrows the concept of comparative advantage: do what you do best, outsource the rest. Your tool gap is your comparative disadvantage. A table saw determines whether you cut cabinet panels yourself or pay someone thirty to fifty dollars per panel. A miter saw handles joinery angles. An orbital sander cuts finishing time by half. A multimeter, soldering iron, and solder sucker become mandatory for crossover work. Audio builders often skip this inventory and wonder why their speakers measure worse than they sound.
- Table saw or panel cutting service: Cabinet panels demand straight cuts and square corners. A table saw costs two hundred to five hundred dollars, or you pay per-cut fees and lose control over material waste and precision.
- Soldering iron and wet sponge: Essential for crossover assembly. A forty-watt iron costs thirty to fifty dollars. Budget for solder, flux, and desoldering wick. This is non negotiable for reliable connections.
- Multimeter and impedance probe: You need to verify driver impedance curves and crossover performance. A basic meter costs twenty to thirty dollars. This prevents building speakers that don’t work with your amplifier.
- Orbital sander or hand sanding block: Cabinet finishing separates amateur builds from functional ones. A sander costs one hundred to two hundred dollars. Without it, expect twenty to thirty hours of hand sanding.
- Clamps and work surface: Crossover assembly and cabinet glue ups require parallel clamps and a flat reference. Invest in eight to twelve clamps and a level assembly table to avoid twisted cabinets and dead zones.
Skill development runs parallel to tool acquisition. Learn your table saw on scrap plywood before cutting cabinet panels. Practice soldering on spare components before touching your crossover. Each tool amplifies your capability only if you respect its learning curve. Start simple: cabinet assembly and driver installation teach you more than forcing precision work before you’re ready.
The Diy Bookshelf Speaker Design Manifesto: Build Your Own Legacy

Tuning Your Sound To Match What You Actually Want
You want permission to stop chasing other people’s measurements. That’s the real reason you’re here. The mechanism is simple: your room, your ears, and your music taste are variables that no mass-produced speaker can account for. Economics calls this “preference heterogeneity”—the fact that what sounds right to you won’t sound right to someone else. DIY speakers exploit this by letting you control crossover frequencies, driver selection, and cabinet damping to match your specific acoustic environment instead of some engineer’s standard curve.
This is where customization becomes tactical. If you listen to jazz in a treated living room, you dial in a different crossover point than someone running rock in an untreated bedroom. You’re not guessing at voicing—you’re measuring response, listening critically, and adjusting port tuning or tweeter angle until the music stops calling attention to the speaker and starts delivering the performance. The work happens in iteration, not inspiration.
The Economics Of Ownership Over Time
Handmade audio compounds in value because you own the parts, the knowledge, and the upgrade path outright. A commercial speaker locks you into the manufacturer’s decisions forever. Your DIY bookshelf speaker becomes modular. When a better tweeter hits the market in three years, you swap it. When you move to a room with different acoustics, you retune the crossover or add port stuffing. A fifteen-year-old DIY speaker with refreshed drivers often outperforms a five-year-old commercial unit sitting in a landfill.
The real leverage is maintenance cost versus replacement cost. You spend thirty dollars on replacement drivers. You spend nothing on licensing or proprietary repair channels. You control the supply chain. When cabinet material warps or a connection corrodes, you fix it with tools you already own. This is the mechanism that separates investment from consumption: every dollar you spend builds toward a tool that gets better with your attention, not worse with time.
The Real Obstacle Isn’t The Speaker, It’s Your Unwillingness To Master The Craft
Most people won’t build these speakers. They’ll read this, feel inspired, then return to their mediocre audio setup because actually doing it requires patience and failure. You’ll solder wrong connections. Your crossovers won’t blend cleanly at first. You’ll learn anyway. That’s the difference between people who own speakers and people who understand sound. Stop researching and order your drivers today. Your ears will thank you once you stop accepting garbage.