

Why Bother With Under Desk Cable Management

Enhance Aesthetics And Safety With A Desk Cable Tray
Tangled cables create visual clutter and pose real safety risks. A cable tray keeps wires organized and out of sight, making your workspace look intentional rather than chaotic. Trip hazards disappear when cables run through a tray instead of across the floor or dangling behind furniture. This simple change transforms a messy desk area into one that functions properly.
Cable trays also protect your wires from damage. Exposed cables get pinched, crushed, and worn down over time. When you route them through a tray, they stay protected from accidental kicks, rolling chairs, and debris. Your workspace becomes safer for everyone who uses it, and you reduce the chance of electrical hazards from damaged cords.
Boost Productivity And Longevity Of Your Gear
Organized cables mean faster troubleshooting when problems occur. You locate the right connection instantly instead of digging through a mess. This saves time during setup changes, upgrades, or when you need to unplug devices. Clear cable routing lets you work efficiently without distraction or frustration.
Protected cables last longer, which protects your equipment investment. Damaged cables fail prematurely and sometimes take connected devices down with them. A cable tray prevents the wear and tear that shortens lifespan. You avoid replacement costs and downtime by keeping your infrastructure intact from the start.

Understanding Different Cable Tray Types Guide

Mesh, Ladder, And Basket Trays Explained
Mesh trays feature a solid perforated or woven surface that supports cables across their entire length. This design distributes weight evenly and works well for dense cable runs. Mesh trays suit environments where cable organization matters and you need visibility of what runs through the system. They cost more than ladder trays but provide superior support for heavier loads.
Ladder trays use two parallel rails connected by rungs spaced several inches apart. This open design allows air circulation around cables and reduces heat buildup. Ladder trays work best for standard cable installations where weight distribution is straightforward. They install faster and cost less than mesh alternatives, making them the default choice for most under desk setups.
Basket trays combine features of mesh and ladder designs with a solid bottom and open sides. They contain cables while allowing airflow and easier cable identification. Basket trays handle moderate cable weights and fit well in tight spaces where you need containment without full enclosure. They balance cost and functionality better than pure mesh options.
Material Matters: Metal Vs. Plastic Cable Management Trays
Steel trays offer durability and support for heavy cable loads over extended periods. They resist deformation from weight and handle temperature fluctuations without warping. Steel costs more upfront but lasts significantly longer in commercial environments. For under desk use where longevity matters, steel provides the best return on investment despite higher initial expense.

Plastic trays weigh less and resist corrosion in humid environments where metal oxidizes. They cost substantially less than steel and install with minimal tools. Plastic performs well for light to moderate cable loads in stable indoor conditions. Choose plastic when budget constraints exist or when your cable count stays below fifteen standard diameter lines.
Pre Installation Checklist Gathering Your Cable Management Arsenal
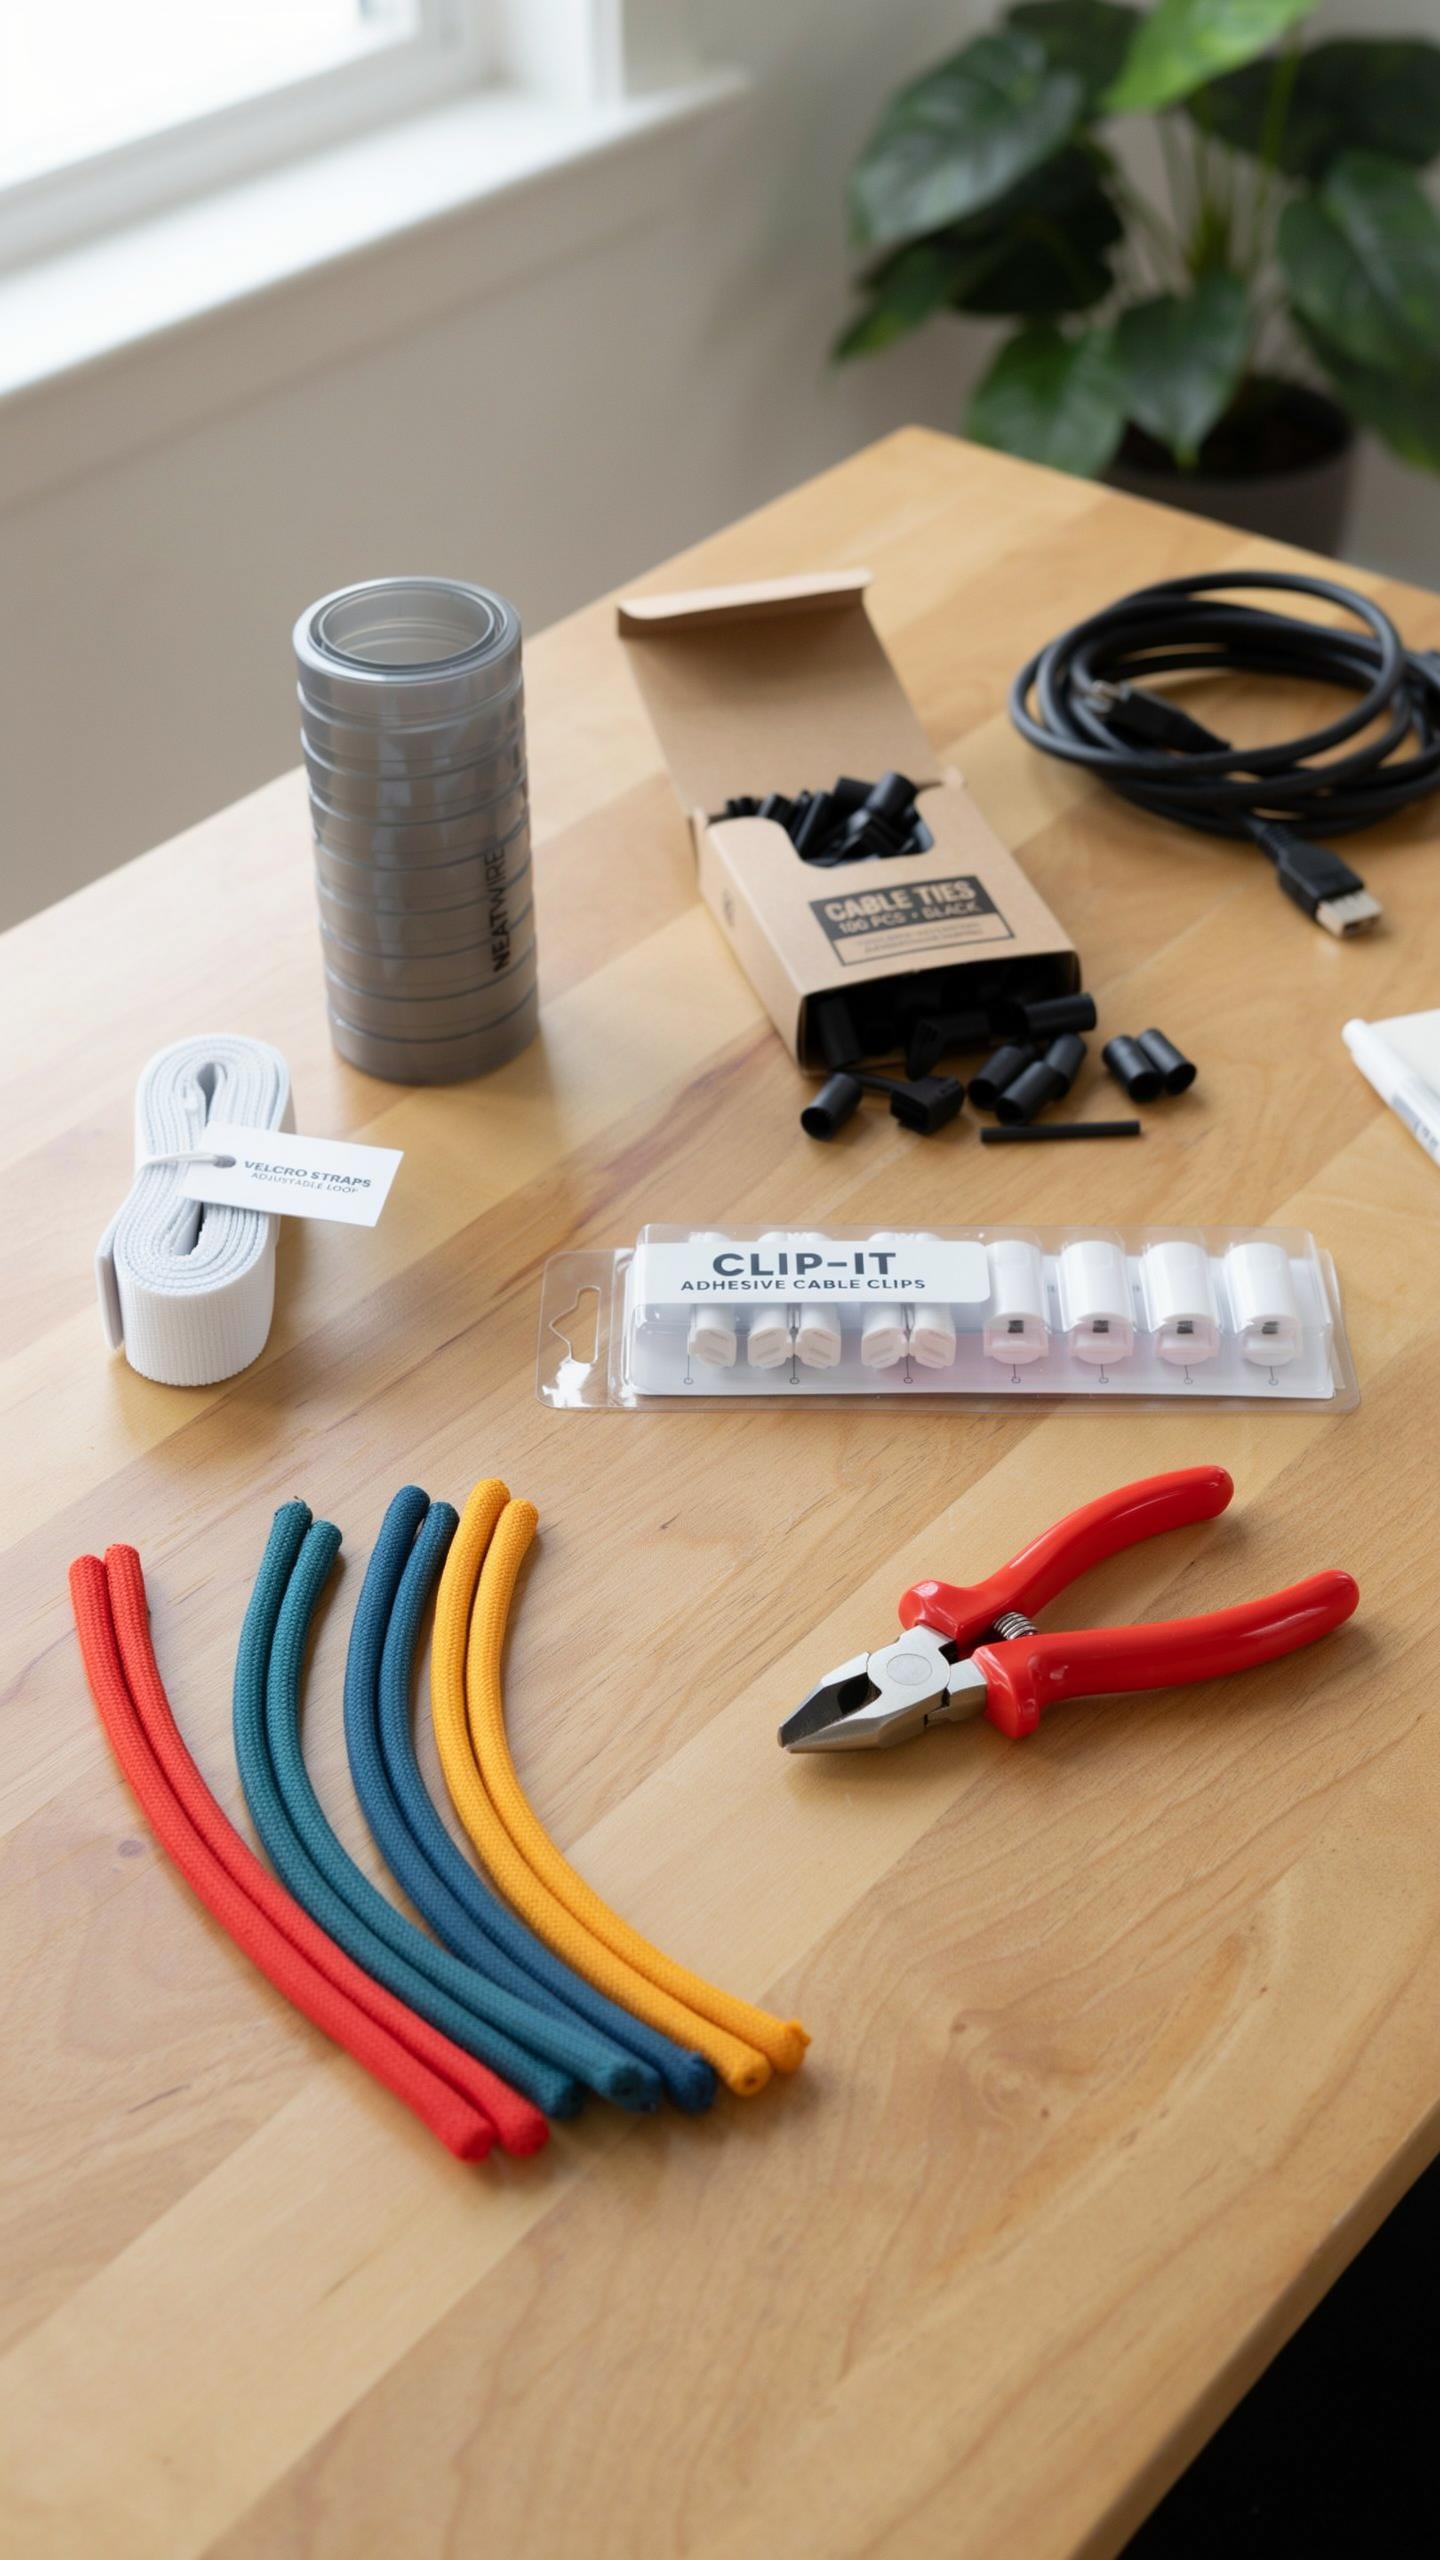
Essential Tools For A Smooth Installation
You need the right tools before you start. Wrong tools waste time and produce poor results. Gather everything now so you don’t stop mid project. This upfront work prevents frustration and rework later.
- Power Drill: Drives screws into desk underside quickly. Battery powered models offer flexibility. Chuck size should accommodate standard bits for your tray hardware.
- Screwdriver Set: Phillips and flathead drivers handle different fastener types. Manual screwdrivers work fine for cable tray mounting. Keep both sizes accessible during installation.
- Measuring Tape: Accurately measure desk length, width, and depth before ordering trays. Standard 25 foot tape handles most desk dimensions. Record measurements in writing to avoid errors.
- Level: Ensures trays mount straight and parallel to desk surface. Cheap two foot levels work for this task. Crooked trays cause cables to shift and bunch.
- Pencil or Marker: Marks mounting holes before drilling. Creates reference lines for tray alignment. Marks transfer to desk when you flip it over.
- Stud Finder or Magnet: Locates metal desk frames or studs behind veneer. Helps you avoid drilling into hollow spots. Prevents weak mounting points that fail over time.
Most cable trays come with mounting hardware and instructions. Check your package contents against the manual before starting. Missing hardware means delays. Order extra fasteners from the tray manufacturer if needed.
Measuring Up: Sizing Your Under Desk Cable Tray
Measure your desk length first. This determines how many trays you need and their total length. Measure from one end to the other. Write down the exact measurement in feet and inches.

Measure desk depth next. Cable trays need clearance from the wall or edge. Most trays sit four to six inches back from the desk front. Standard tray depth ranges from four to eight inches. Choose depth based on cable volume and leg room needs.
Account for desk shape and obstacles. L shaped desks need multiple tray sections. Monitor stands, keyboard trays, and existing cables take up space. Sketch your desk layout with these items marked. This prevents ordering trays that won’t fit your setup.
Consider cable volume when selecting tray width. Light users with five to ten cables need narrow trays. Heavy users with fifteen or more cables need wide trays. Standard widths range from six to twelve inches. Oversized trays provide room for future additions.
Step By Step Under Desk Cable Tray Installation
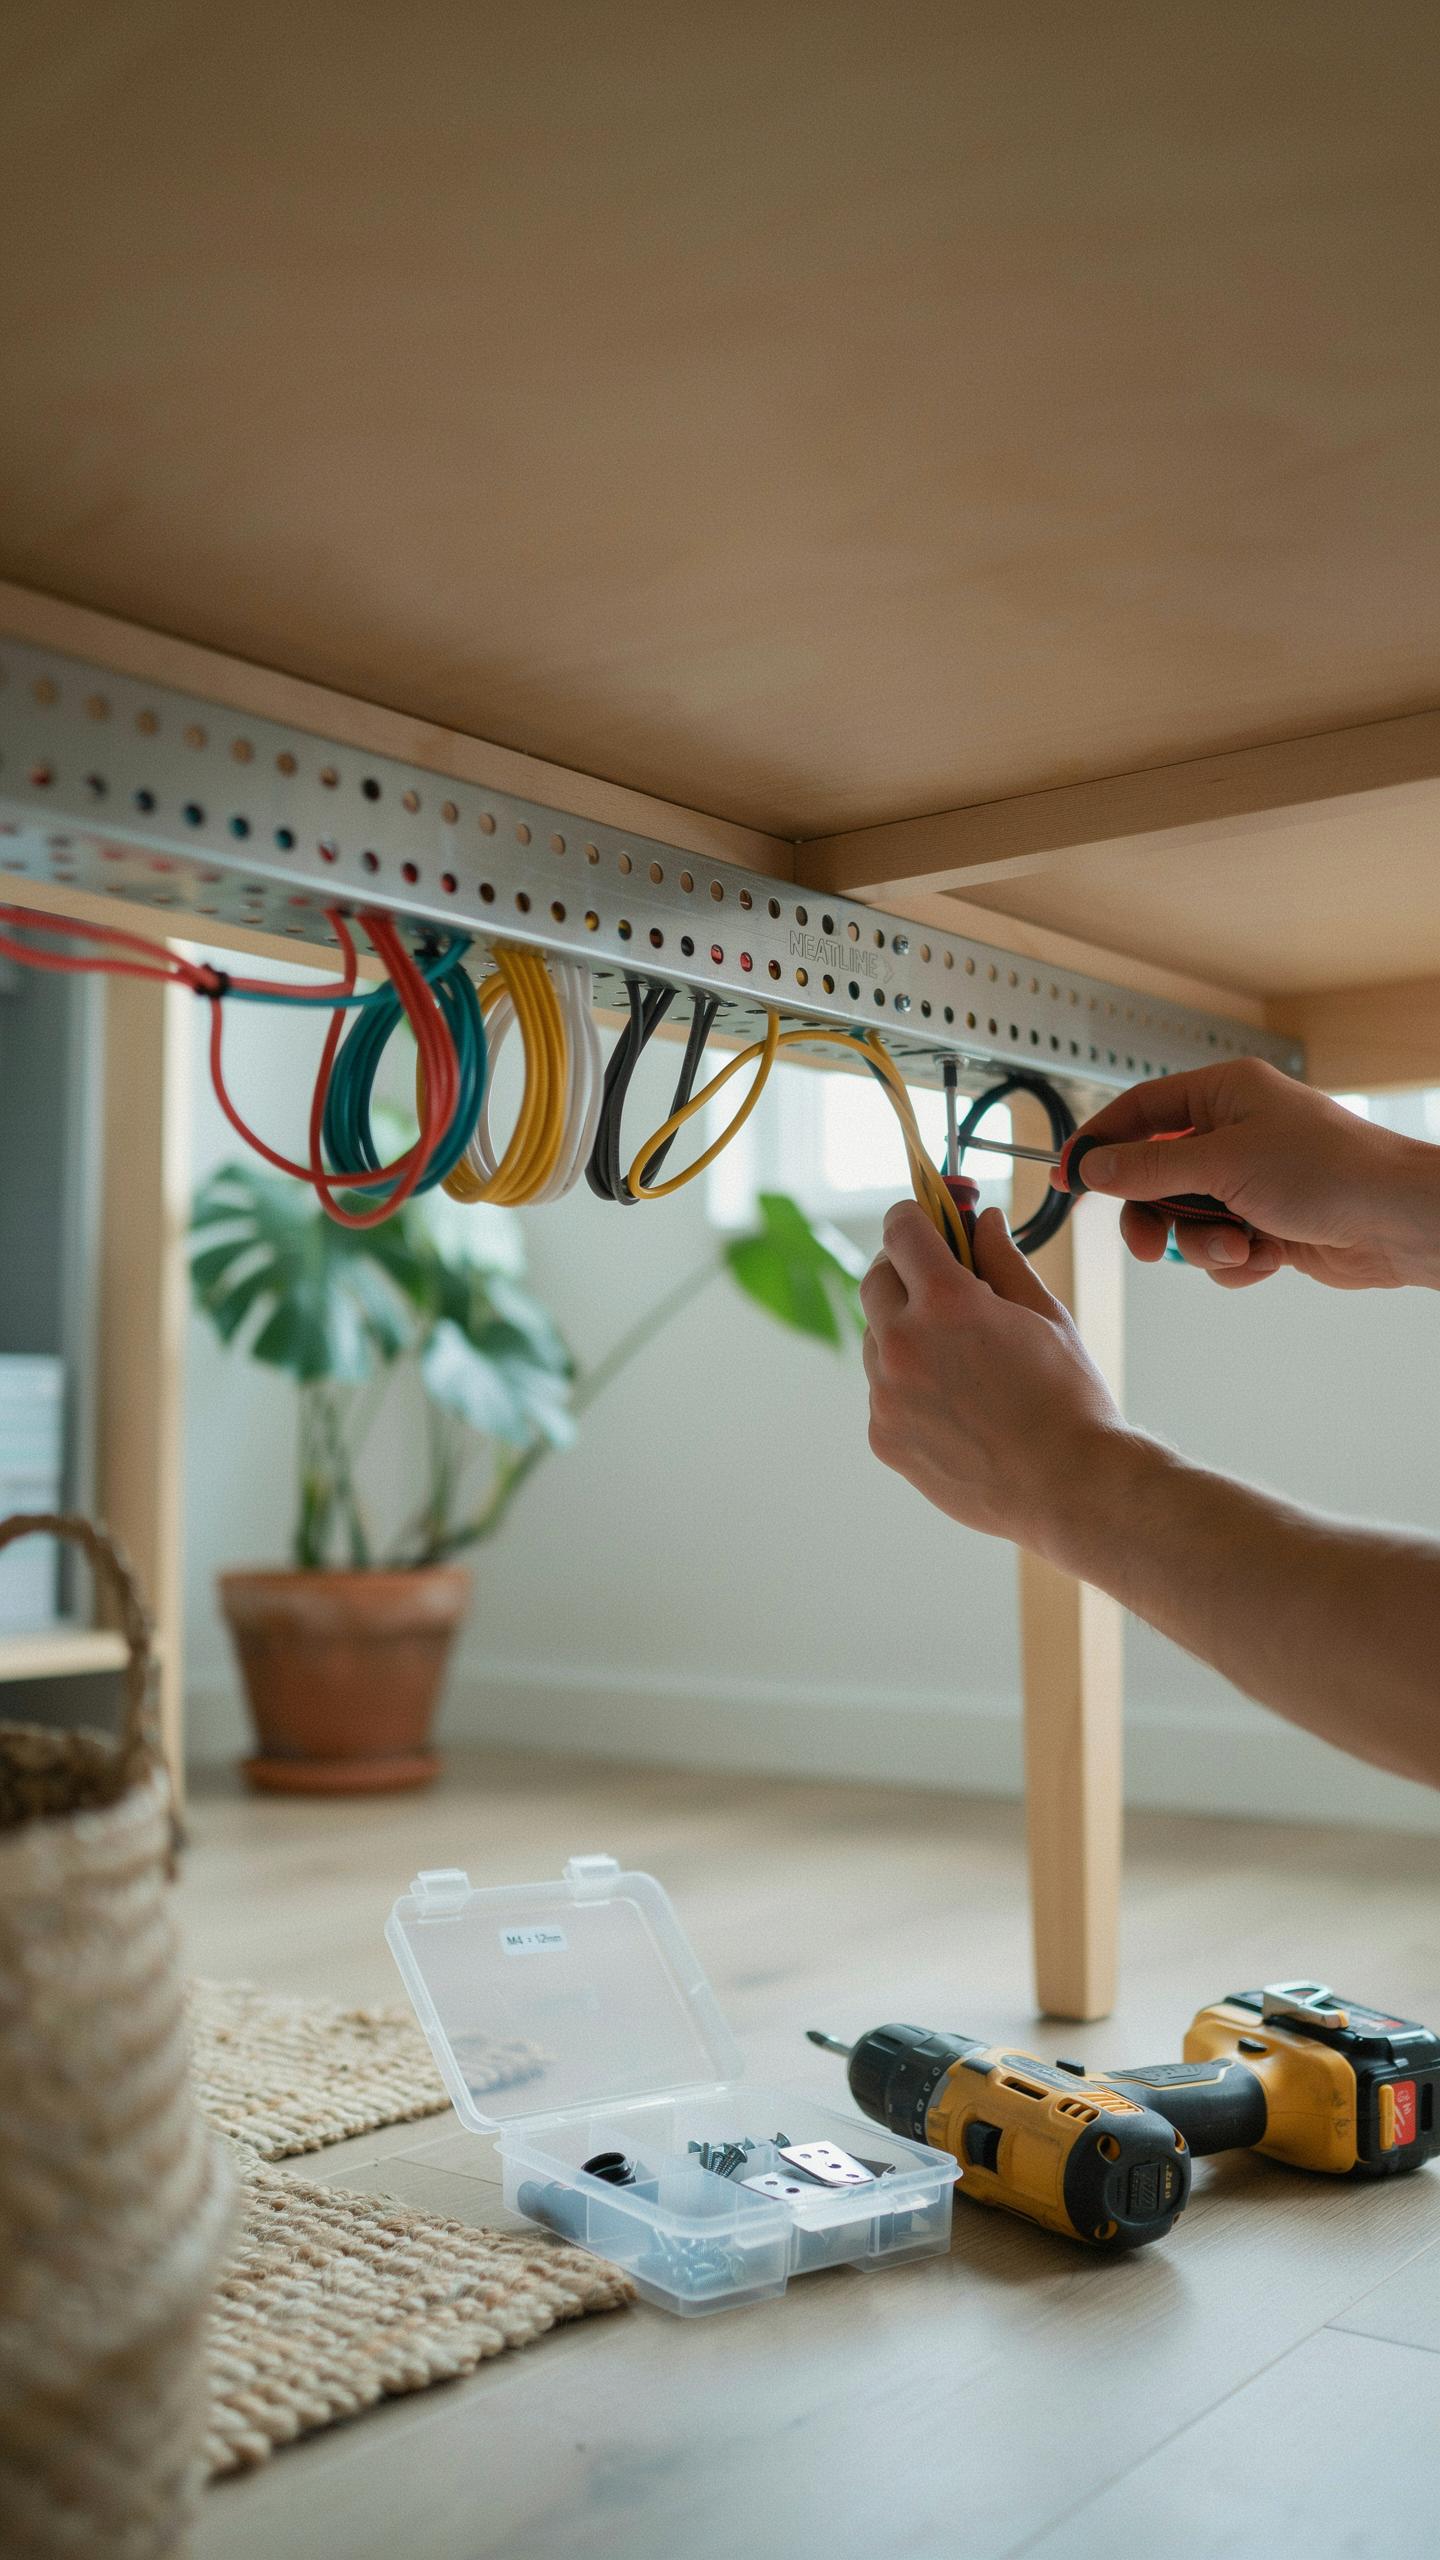
Mounting The Tray: Securing Your Cable Organizer
Locate the desk underside where you want the tray. Mark mounting points using the tray’s bracket holes as your template. Use a drill with an appropriate bit for your desk material, whether wood, metal, or composite. Install brackets first, then secure the tray to the brackets using the provided hardware. Verify the tray sits level and doesn’t obstruct knee clearance or desk drawers.

Tighten all fasteners fully to prevent tray sagging under cable weight. Check mounting stability by applying downward pressure on the tray. A stable installation prevents cables from shifting, which causes disconnections and tangling. Most cable trays support 10 to 25 pounds, depending on the model and bracket quality. Confirm your total cable weight stays within this limit before completing installation.
Cable Routing Basics: Optimizing Your Cable Pathways
Start by grouping cables by type and length. Route power cables, data cables, and audio cables in separate channels if your tray has dividers. Run cables parallel to the tray’s length rather than crossing them diagonally. Secure cables with velcro straps or clips at 12 to 18 inch intervals to prevent shifting. Leave slack at connection points so you can unplug devices without straining the cables.
Document your cable setup by labeling each cable at both ends. This prevents confusion when troubleshooting or replacing equipment later. Ensure cables don’t bend at angles tighter than the manufacturer’s minimum bend radius, typically two to three inches for standard cables. Route cables away from heat sources like power supplies or equipment vents. Proper routing extends cable lifespan and reduces interference between adjacent cables.
Office Desk Cable Management Tips For A Tidy Workspace

Utilizing Cable Ties And Sleeves For A Clean Look
Cable ties secure bundles and prevent tangling. Use hook and loop cable ties rather than plastic zip ties for adjustability without damage to cables. Route tied bundles along the tray edges to maximize workspace. Neoprene sleeves slide over multiple cables to group them visually and functionally. Spiral wraps compress cables into single columns. These tools work together with your tray to eliminate clutter at the source.
Velcro-based cable ties allow you to adjust routing when equipment changes. Nylon sleeves resist fraying and last longer than fabric alternatives. Apply ties every 12 to 18 inches along cable runs to prevent sagging. Keep tension moderate to avoid crushing wire insulation. This layered approach transforms a functional tray into a professional installation that remains manageable during upgrades and maintenance.
Power Strip Placement And Surge Protection
Mount power strips inside the tray or directly beneath your desk surface for easy access. Position strips perpendicular to cable flow to prevent overcrowding in any single area. Surge protectors with circuit breakers add protection against electrical spikes that damage equipment. Placement near the desk edge allows cables to exit toward devices without excessive routing. Never stack power strips or exceed the rated capacity printed on each unit.
Secure power strips to the tray or desk underside with adhesive backing or small brackets to prevent shifting. Keep the power cord exit clear of foot traffic and rolling chair wheels. Test the surge protector monthly by pressing the test button to verify the internal breaker functions. Route the strip’s power cable through the tray system alongside data cables for a unified installation. Proper placement reduces fire risk and equipment damage while maintaining the clean appearance your tray provides.
Advanced Cable Management Ideas Desk Edition

Integrating Cable Clips And Adhesive Mounts
Cable clips and adhesive mounts solve the gap between your tray and desk surface. These accessories secure individual cables to your desk underside, preventing them from sagging or tangling. They work best for power cords, USB lines, and monitor cables that don’t fit neatly inside the tray. Install clips every 12 to 18 inches along cable runs for proper support and strain relief.

Adhesive mounts attach directly to desk surfaces without drilling or fastening hardware. They handle lighter loads better than clips and work well on curved or textured surfaces where clips might slip. Choose mounts rated for your cable weight before installation. Combine both types strategically to create a hybrid system that keeps every cable in position and prevents movement during daily desk work.
Future Proofing Your Setup Planning For New Devices
Design your tray with empty space reserved for growth. Install a tray size one step larger than your current needs require. This buffer accommodates new monitors, printers, or peripheral devices without forcing you to replace the entire system. Leave at least 20 to 30 percent of tray capacity unused during initial setup to handle upgrades.
Plan cable routes with extension capability in mind. Run conduit or larger diameter trays that allow you to pull additional cables through without dismantling existing infrastructure. Position your tray closer to the center or rear of your desk rather than at edges, giving you flexibility to add cables on either side. Choose modular tray systems that connect end-to-end rather than fixed single units, enabling horizontal expansion when your device count increases.
Troubleshooting Common Cable Management Challenges

Dealing With Excess Cable Length
Excess cable length creates visible clutter and makes repositioning equipment difficult. The solution is simple: coil unused portions and secure them with velcro straps or cable clips mounted to the tray. Never bunch cables tightly, as this damages insulation and creates heat buildup. Use the coiling method where you loop excess cable in manageable circles, then bind them with a single velcro strap to keep coils from unraveling during desk vibration or equipment movement.

Some setups require cables longer than the actual run distance. This happens when you buy standard lengths or plan for future repositioning. Cut cables to proper length if you control both ends, or purchase shorter cable variants designed for compact spaces. Route excess length along the tray perimeter rather than piling it in the center. This approach preserves tray capacity and prevents cables from pressing against equipment placed on or near the tray.
Remember those tangled days beneath your desk? Installing a cable tray isn’t just about tidiness; it’s about reclaiming a little peace, one organized wire at a time.
Addressing Power Brick And Adapter Clutter
Power bricks and adapters occupy significant space and create tangled connections. Store them in dedicated cable management boxes designed to mount under desks or attach directly to tray frames. Position boxes at the tray’s end or along its edge to keep them out of your equipment’s operating zone. Label each brick with its corresponding device using masking tape or a label maker. This prevents unplugging the wrong adapter during troubleshooting and speeds up equipment swaps.
Mount power strips directly onto cable tray supports using heavy-duty adhesive strips or mounting brackets. This keeps bricks organized in one location rather than scattered across the tray floor. Route individual power cables from each brick through separate channels within the tray to prevent one failed adapter from disconnecting multiple devices simultaneously. Ensure the power strip remains accessible for power cycling when needed, and maintain clearance around ventilation ports to prevent overheating.
Maintaining Your Clean Cable Management System

Regular Checks For Wear And Tear On Your Cable
Inspect your cables monthly for cuts, fraying, or exposure of internal wiring. Physical damage compromises safety and functionality. Check where cables bend most frequently, as these stress points deteriorate first. Look for discoloration, melting, or hardening of cable insulation. Replace damaged cables immediately to prevent electrical hazards and equipment failures.

Document your inspection dates and findings. This tracking reveals patterns in cable failure and helps you replace components before they fail. Pay special attention to cables near heat sources or high-traffic areas. Monitor cable ties and clips for signs of over-tightening that restricts airflow or damages wire jackets. Preventive replacement costs far less than recovering from electrical failure.
Dusting And Cleaning Your Desk Cable Tray
Dust accumulation blocks airflow around cables and creates fire risk through heat retention. Clean your cable tray every two weeks using a dry microfiber cloth. Disconnect power to your system before cleaning. Wipe each cable individually and the tray surface thoroughly. Dust settles quickly in enclosed spaces, so consistent cleaning prevents buildup that attracts debris and pests.
Use compressed air for hard-to-reach areas where cables bunch together. Hold the air can upright and use short bursts to avoid moisture damage. Never use liquids or wet cloths on active electrical components. Remove visible debris by hand first, then follow with dry cleaning methods. A clean tray maintains equipment longevity and ensures your organized system stays functional and safe.
Frequently Asked Questions

What exactly is an under desk cable tray, and why would I need one?
An under desk cable tray is a clever organizing solution that attaches beneath your desk to conceal and manage unsightly power cords, data cables, and power strips. It prevents tangles, protects wires from damage, and creates a much tidier, more professional workspace, improving both aesthetics and safety. An under desk cable tray installation guide will walk you through the setup.
What’s the easiest way to install an under desk cable tray if I’m not very handy?
For beginners, the easiest installation method often involves trays that clamp directly onto the desk edge, requiring no drilling. Simply position the tray, tighten the clamps, and you’re ready to organize your cables. Always refer to your specific under desk cable tray installation guide for the most straightforward instructions to ensure a secure fit.
Are there affordable under desk cable tray options that are still effective for organizing?
Absolutely! Many effective under desk cable tray options are very budget-friendly. You can find simple, mesh, or plastic trays that offer great cable management without a hefty price tag. Look for kits that include basic mounting hardware or adhesive options for an easy and affordable setup.



