
The Illusion Of Serendipity: Why “Finding” Reflections Fails

The Myth Of The Perfect Reflective Surface
You want to believe reflection photography works like luck so you don’t have to take responsibility for bad shots. The truth is harder: most reflective surfaces fail because they’re not actually reflective enough or they distort in ways your eye skips over but your camera sensor captures dead-on.
Water and glass reflect light at different angles depending on their finish, contamination, and angle of incidence. A lake looks mirror-smooth from fifty feet away. Up close through your iPhone lens, you see algae bloom, particulates, ripples that break the image into fragments. The surface you “found” was never actually suitable for the shot you wanted.
Active Manipulation Over Passive Waiting
Waiting for the right light to hit the right reflective surface is how amateurs waste hours. Professionals change the variables instead. Move the object you’re photographing. Shift your position. Angle your phone differently. Manipulate the water or glass between you and your subject until the reflection becomes usable.
This is the core mechanism: reflection quality isn’t discovered, it’s engineered. You control angle, distance, time of day, and subject placement. Your iPhone’s sensor will show you exactly what works when you stop hunting for perfection and start building it through deliberate adjustment. Test each variable in sequence until the reflection sharpens into focus.
The Water Canvas Protocol: Mastering Liquid Mirroring
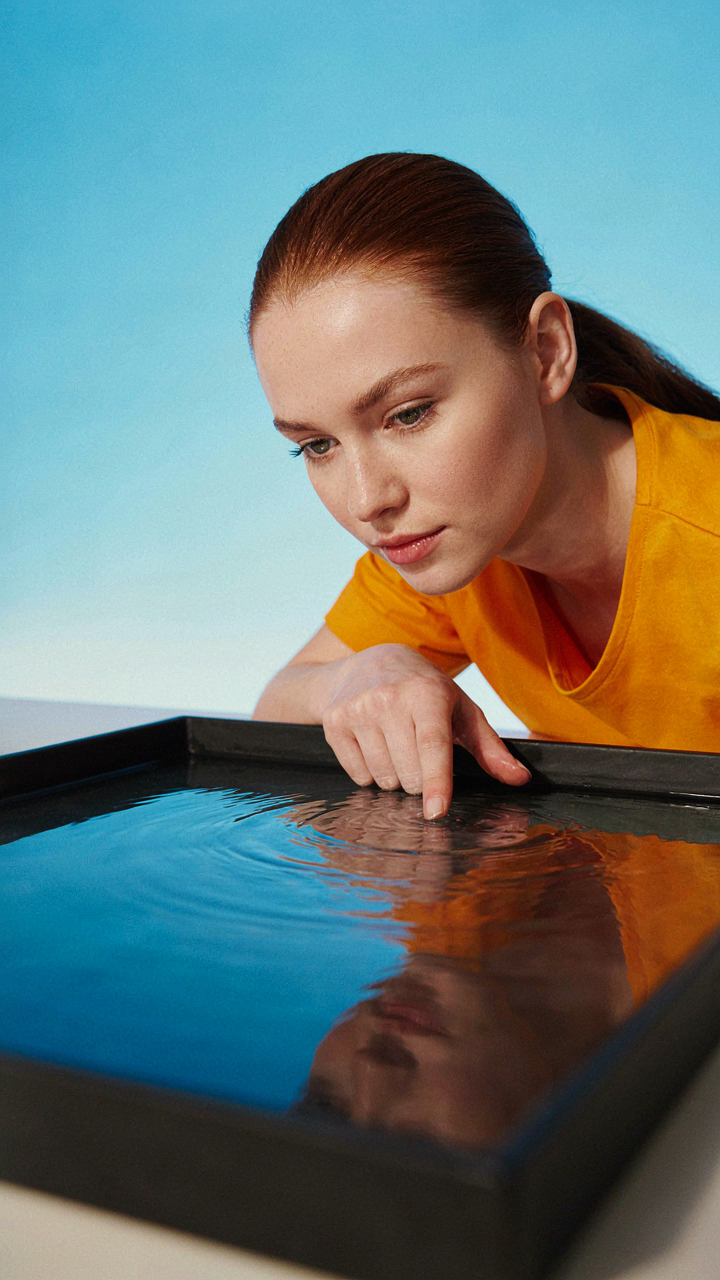
Standing Water Beats Natural Puddles
You want the reflection without the work. That’s the real reason this matters. Most iPhone photographers wait for rain or hunt puddles, which is reactive and unreliable. You control the reflection by creating it yourself. Fill a shallow container, place it where your subject sits, and you own the geometry. Still water reflects light predictably. Moving water doesn’t. The difference between a sharp mirror and useless chaos is whether you engineered the surface or left it to chance.

Ripples are a tool, not an accident. Small, deliberate waves create rhythm in your frame. Tap the water’s edge with your finger just before the shot. The ripple propagates outward in expanding circles, splitting your reflection into layers. This adds depth without needing a tripod or focus-stacking. The mechanism: each ripple bends light at a slightly different angle, so parts of your reflection stay sharp while others blur. That layering is what separates amateur reflection shots from intentional ones.
Angle Is Where Physics Becomes Photography
Light doesn’t bounce off water the same way from every angle. Optics calls this the angle of incidence, and it applies directly to iPhone reflection photography. The angle at which light hits the water surface determines whether you get a mirror or a mess. At shallow angles (your phone parallel to water), reflections appear bright and true. At steep angles (phone pointed down), water becomes transparent and you see through to the bottom instead of seeing reflections. This isn’t subjective. It’s the law.
Position your light source and phone so they form a tight angle with the water’s surface. Morning or late afternoon sun works because the light already sits low on the horizon. Your phone camera should hover close to the water, not above it. Move the phone until the reflected light dominates your viewfinder. You’ll feel the moment the surface shifts from window to mirror. When you achieve that angle, the reflection locks. Hold it and shoot.
Glass: Beyond The Window Pane – Strategic Obstruction

Glass As A Layered Element, Not Just A Barrier
You want glass to feel intentional in your frame, not like you just happened to shoot through a window. Most phone photographers treat glass as an obstacle to see past. That’s backwards. Glass surfaces create depth separation that your iPhone sensor actually handles well because the reflective property isolates the foreground layer from the background. Place glass in the composition actively—let it sit between your subject and the camera as a deliberate compositional plane, not transparency you’re trying to eliminate.

The iPhone’s limited dynamic range makes this work in your favor. Glass creates a natural layer that splits the tonal information. One layer holds the reflection (usually brighter), another holds the transmission through the glass (usually darker). Your sensor processes these as distinct elements rather than trying to hold detail across a massive tonal range. Position yourself so the glass plane occupies the middle third of your frame, then expose for either the reflection or the transmitted light—not the average. This decision determines whether glass reads as an effect or an accident.
Angle Of Incidence Meets Angle Of Reflection
Physics governs this directly: the angle at which light hits a surface equals the angle at which it bounces off. This is Snell’s law in action, and it’s the single governing rule of how your iPhone captures reflections in glass. Most tutorials skip this and just say move around until it looks good. That’s wasted time. You need to map the angles deliberately.
Stand perpendicular to the glass plane to control what reflects into your lens. At 90 degrees to the surface, you capture the cleanest reflection because the light path is shortest and most direct. Shift even 15 degrees, and the angle of incidence changes, which shifts what reflects into your frame entirely. Your subject moves in the glass without moving in reality. Use this: position yourself so the angle creates a reflection of something worth showing, not just ambient room light or your own silhouette. Then lock your position. Every step changes the reflection physics.
Your Phone Screen As A Portable Reflector: IPhone Reflection Ideas

Capturing The Screen’s Light In Your Frame
You want to look intentional without buying gear. Here’s what everyone misses: your phone’s screen is a light source, not just a reflective surface. In optics terms, it functions as a secondary light emitter. When you shoot into glass or water with your phone visible in the frame, that bright rectangle becomes a controllable highlight that reads as deliberate composition, not accident.

The mechanism works because your screen outputs consistent luminance. Place your phone at an angle where its glow hits the reflective surface you’re shooting, and it bounces back into your lens. The viewer sees the reflection as part of the image’s visual hierarchy, not a flaw. This transforms a simple shot into something that looks composed. Position the phone off-center in the reflection to create depth and draw the eye through the frame.
Managing Brightness To Control What Bounces Back
Most advice here is incomplete: brightness matters more than angle. The intensity of your screen’s light determines whether the reflection dominates or whispers in the background. Open a white or light-colored app and the reflection strengthens immediately. Pull up a dark image and the reflection nearly vanishes. This gives you direct control over reflection intensity without moving your camera or repositioning anything else.
Test this before shooting. Set your screen to maximum brightness, open your camera app, and watch how aggressively the reflection appears in glass or water. Drop brightness to 30 percent and the effect becomes subtle. Use this slider as a compositional tool: bright screen for foreground interest, dim screen when you want the reflection present but not dominant. Adjust screen brightness between each shot to build options fast.
The Light Equation: Illuminating Your Phone Reflection Photography

Backlighting For Contrast And Clarity
You want the reflection to look intentional, not accidental. That requires light positioned behind your subject, which is the inverse square law applied to iPhone reflection photography: intensity drops predictably as distance increases, so backlighting forces your phone’s sensor to expose for the bright background, turning the reflection itself into a high-contrast graphic element.

Position your light source behind the reflective surface, whether water or glass. The iPhone’s metering system will read the bright backdrop and underexpose the foreground, carving the reflection into sharp definition. This creates separation. Silhouettes form naturally. The reflection becomes the subject, not a accident in the frame.
Side Lighting To Reveal Surface Detail
The mistake most people make is assuming even light is always better. It isn’t. Side lighting rakes across the surface at an angle, which exposes texture and dimensional variation that flat, frontal light erases completely. This is basic modeling from classical painting: light from the side reveals form. Apply it here.
Angle your light source 45 to 90 degrees perpendicular to your primary subject. Watch how ripples in water catch the light selectively. Watch how dust or imperfections on glass become visible. The reflection gains depth because the surface itself becomes legible. Shoot from the opposite side of that light to capture the modeled surface and its reflection simultaneously. The interplay between shadow and highlight defines the entire image.
Camera Settings For Unforgiving Clarity In Reflection On Reflections In Photography
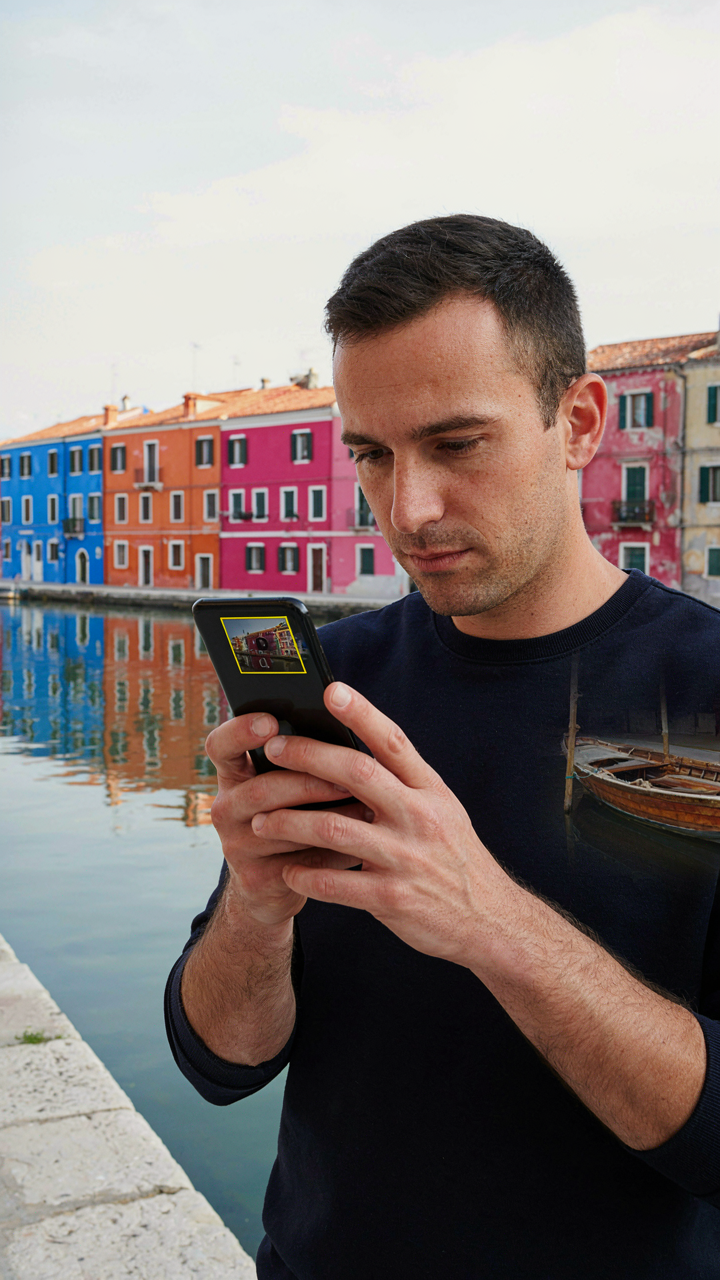
Lock Focus On The Plane That Matters
You want the reflected subject sharp because you’re betting your composition on it, but iPhone’s autofocus treats reflections like ghosts. The real mechanism here is optical physics: your phone’s sensor sees through the reflective surface first, then processes the bounce. Manual focus forces you to choose which plane wins. Tap and hold on the reflection itself until the yellow focus box locks. Don’t release. This overrides the phone’s tendency to hunt between the glass surface and what lies behind it.

The discipline of manual focus removes the guess work autofocus introduces. You’re no longer fighting the camera’s algorithm trying to lock onto the wrong depth. Once locked, recompose without lifting your finger. Your iPhone maintains focus on that exact plane. This is non-negotiable for reflections because even one foot of distance between subject and glass creates a focus split. Lock it first, composition second.
Exposure Compensation Against Bright Surfaces
The common advice tells you to expose for the reflection. That’s incomplete because reflective surfaces bounce light directly into your sensor, creating a false reading. Think of exposure metering like targeting: the camera spots the brightest thing first and assumes everything else should dim around it. Your reflection sits on glass or water that reads as overexposed, so the phone underexposes the entire frame to compensate. You end up with crushed shadows and blown reflections both.
Slide the exposure slider up plus one to plus two stops when shooting reflections. Start there, then adjust based on what you see. The reflective surface itself doesn’t need perfect exposure because reflections inherit some of that bounce anyway. Prioritize the reflected subject and the darker surroundings. Take one test shot, check the histogram if your iPhone shows it, then dial in the final compensation before you commit to the frame.
The Composition Cadence: Framing Photography Reflections

Where The Reflection Lands In Frame
You want permission to break the rules without looking like you don’t know them. That’s what this section is really about. The rule of thirds isn’t dogma for reflection photography—it’s a starting point that works because it creates visual tension between the reflected object and the surface doing the reflecting.

The mechanism comes from how your eye processes layered information. When you place a reflection on a third line, you anchor it spatially while leaving breathing room for the reflecting surface itself. The iPhone screen’s aspect ratio (9:16 on portrait, where most iPhone reflection work happens) actually forces this decision harder than wider cameras do. You’re not filling negative space—you’re deciding which third gets the reflection and which gets the context.
- Vertical thirds in water reflections: Position the reflected subject on the left or right third line, leaving the water surface and sky to occupy the remaining thirds. This creates depth without symmetry.
- Horizontal thirds with glass surfaces: Place reflections along the top or bottom third, with the glass plane cutting through the middle third. The viewer reads foreground, reflection, and background as separate layers.
- Corner placement over center: Pushing reflections into corners (intersection of two third lines) creates more tension than center framing. It forces the viewer to scan the entire frame.
- The reflecting surface as compositional anchor: Don’t center the water line or glass edge. Place it on a third line to control how much reflected content the frame contains.
- Bleed and crop strategy: Let reflected elements partially exit the frame on a third line. This suggests the reflection continues beyond what the iPhone captures, adding scale.
The thirds work because they match how you naturally scan images. Your eye hits points of interest before settling on the whole frame. On an iPhone, where the screen is narrow and vertical, this principle matters more than on a desktop where you have horizontal real estate to work with. Test by taking the same reflection three times: center the subject, place it on the left third, place it on the right third. You’ll see the thirds version gives you compositional control instead of compositional default.
Mirrored Tension Against Broken Balance
Symmetry is the trap most iPhone reflection photographers fall into because it feels like it should work. A perfectly centered reflection, split down the middle—it looks intentional. It also looks static. Asymmetry is harder because you have to justify why the reflection doesn’t match what’s reflected. That justification is where the actual composition lives.
The physics principle here is equilibrium. In mechanical systems, perfect balance means no tension, no reason to look. Asymmetrical compositions create visual imbalance that demands resolution. Your brain wants to reconcile what’s reflected with what’s not reflected. When you break that symmetry deliberately—by cropping part of the reflected subject, by tilting the reflecting surface, by letting light hit only half the reflection—you create a question mark. The viewer stays in the frame longer because they’re reading the tension, not confirming what they already see.
Broken symmetry works tactically because it stops scroll. A phone user seeing a perfectly symmetrical reflection thinks they understand it in one second. An asymmetrical reflection—where the reflection doesn’t align with the object above it, or where the water surface tilts, or where light fractures the reflection—requires a second look. That’s the mechanism: asymmetry forces cognitive processing instead of recognition.

The practical move is this: compose the reflection first, then deliberately break the alignment. Tilt your iPhone so the reflecting surface isn’t perpendicular to gravity. Let shadows fall on only part of the reflection. Crop so the reflected element extends beyond the reflecting surface’s edge. One of these moves in every shot. Symmetry is the default. Make asymmetry your system.
Beyond The Obvious: Unconventional Reflective Surfaces For Phone Photography

Polished Metals And Ceramics As Mirrors
You want this section because you’re tired of water and glass—the obvious moves everyone else is already executing. Here’s the mechanism: metals and ceramics work because they have a different optical behavior than water. In optics, specular reflection happens on smooth surfaces, and diffuse reflection happens on rough ones. Polished metals sit at the extreme end of specular reflection, meaning they bounce light with almost no scatter. Your iPhone’s lens sees a cleaner, sharper reflection with higher contrast than water allows.
The catch is surface preparation. A ceramic mug fresh from the cabinet won’t work—the glaze has micro-irregularities that scatter light. You need either genuine polished surfaces like stainless steel cookware, brushed aluminum frames, or glazed ceramics that have been buffed smooth. Brass and copper age differently, developing patina that kills reflection. Stainless steel stays consistent. The reflection you get from a polished metal surface is tighter and more dramatic than water because there’s zero absorption—every photon either reflects or doesn’t. This creates higher saturation and more defined edges in your composition.
Reflections In Oils, Coffee, And Other Liquids
Most reflection photography advice stops at water because it’s predictable and teachable. That’s incomplete. Oil, coffee, tea, and milk create reflections with different optical densities, which changes how light bends at the surface. This is basic refraction—the same principle cameras use in lens design. Different liquids have different refractive indices. Oil sits around 1.47, water at 1.33. Higher density means light bends more, warping your reflection in ways water doesn’t.

The practical application: a shallow pan of vegetable oil creates reflections that shimmer and shift as you move your phone. Coffee and tea add color and opacity, which darkens your reflection and increases contrast. These aren’t better than water—they’re different tools for different compositions. Oil works for abstract, warped reflections. Coffee works when you want muted tones and softer edges. The risk is consistency. You can’t reliably replicate an oil reflection the way you can water. That unpredictability is the point. Shoot multiple angles and multiple surfaces, then pick the frame where the refraction creates the composition you intended.
Post Processing Mastery: Refining Your Iphone Reflection Pictures

Separation And Contrast In Reflected Zones
You want the reflection to look intentional, not like you got lucky. The mechanism is simple: reflections sit in a different light plane than direct subjects, so they tank in contrast the moment you shoot them. Your phone’s sensor captures less detail in the reflection because light bounced twice before hitting the sensor. Boost contrast selectively using Curves or Levels, but only on the reflected area. Mask out the direct subject first. Reflected zones need 15 to 25 percent more contrast than you think they do to read as intentional in the final frame.
The real mistake most shooters make is treating the reflection as one tonal object. It isn’t. Water reflections lose saturation and punch in shadows; glass reflections flatten midtones. In Lightroom or Capture One, use the adjustment brush to target just the reflected section. Increase clarity by 10 to 15 points. Push vibrance before saturation because saturation will blow out already thin highlight detail in the reflection. The reflection should compete visually with the main subject, not whisper behind it.
Crop For Dominance, Not Composition
Reflection photographs fail when the composition treats the reflection as supporting cast. Crop to make the reflection the frame’s primary real estate. Tighten the frame so the reflection occupies 50 to 65 percent of the image. This isn’t about rule-of-thirds; it’s about forcing viewer attention onto what matters. Most phone users crop for balance. That’s the wrong instinct here. Imbalance reads as intention.
Use your phone’s native crop tool or a dedicated app like Snapseed. Zoom in tighter than your instinct allows. If you’re hesitating, you haven’t cropped far enough. The reflection needs to dominate without the composition feeling broken. Aim for a crop that makes the direct subject almost secondary, visible only as context for the reflection. Lock this crop in. You’ll see the reflection’s actual visual weight the moment you remove dead space around it.
The Real Obstacle Isn’t Your IPhone, It’s Your Expectation Of Magic Over Mastery

You’re waiting for the perfect reflection. You’re not. You’re avoiding the work of finding ten bad ones first. Every photographer you admire shot hundreds of forgettable frames before one landed. Your iPhone does exactly what theirs does. The gap between their portfolio and yours isn’t equipment. It’s the willingness to look stupid in public while you learn. Pick one surface today. Water, glass, mirror. Shoot until you hate what you see. That hatred means you’re getting closer. Mastery doesn’t whisper. It demands repetition.



