


Introduction
Microscope illumination plays a crucial role in ensuring proper visibility and clarity while examining specimens. A well-designed microscope illuminator provides even lighting, reducing shadows and enhancing the viewing experience. In modern microscopes, LED ring lights and LED illuminators are commonly used due to their efficiency, adjustable brightness, and long lifespan. These lighting systems help illuminate the specimen, ensuring researchers or industrial workers can see every detail clearly. Whether you’re using a fiber optic system or a dual gooseneck lamp, the goal is to achieve consistent, bright illumination that makes microscopy easy and effective.
With advancements in lighting technology, today’s microscopes can use almost any brand light source while still providing high-quality illumination. LED bulbs, for instance, shine very bright with minimal heat output, making them ideal for long-term use. Moreover, the adjustable light intensity control allows users to fine-tune the brightness based on the specimen, ensuring accurate results. Whether for scientific research or industrial applications, proper microscope illumination is essential for precision.
Key Takeaways
Microscope illuminators are essential for providing even lighting, which reduces shadows and improves clarity during specimen observation.
LED ring lights offer shadow-free, consistent illumination, making them ideal for both stereo microscopes and tasks requiring precision, like fluorescence microscopy.
Adjustable brightness in LED illuminators allows users to control light intensity, ensuring better visual results without overexposing the specimen.
LED illuminators are energy-efficient and long-lasting, providing a low-heat option compared to traditional halogen bulbs, which tend to burn out quickly.
Halogen illuminators produce intense light, useful for tasks requiring high magnification, but they generate more heat and have a shorter lifespan.
LED ring lights are versatile across fields, from biological research to industrial inspection, offering adaptable brightness control for various applications.
Understanding the Role of a Microscope Illuminator

In microscopy, the microscope illuminator is key to ensuring proper visibility. It provides the necessary light source, allowing clear viewing of specimens. Whether it’s a built-in system or an external addition, the illuminator ensures even illumination, enhancing the accuracy of research or observation. The microscope illuminator is designed to meet different microscopy needs, whether in scientific research, medical labs, or industrial applications. Most modern microscopes now feature LED illuminators for longer life and better energy efficiency, making it easy to use while reducing heat output.
Understanding the Role and Functions of Microscope Illuminators and LED Ring Lights
1. Importance of Consistent Lighting in Microscopy
Microscope illuminators play a critical role in ensuring consistent, even lighting, which enhances the clarity and visibility of specimens. A well-designed microscope illuminator reduces shadows and allows for accurate observations, making it essential in both scientific and industrial applications.
2. LED Illuminators: Energy Efficiency and Long Lifespan
Modern LED illuminators are preferred due to their energy efficiency and long lifespan. These systems consume less power while providing bright, consistent illumination, making them suitable for extended use in research labs and industrial inspections. LED bulbs also generate less heat, preserving specimen integrity.
3. Adjustable Brightness for Versatile Use
Microscope LED ring lights are equipped with adjustable brightness controls, allowing users to fine-tune the light intensity according to the type of specimen being observed. This feature ensures the proper illumination needed for high-precision tasks like fluorescence microscopy.
4. Fiber Optic Illuminators for Specialized Applications
For tasks requiring focused or flexible light positioning, fiber optic illuminators are highly effective. These systems allow precise adjustments, making them ideal for specialized scientific or medical research where exact lighting is essential.
5. Comparing LED and Halogen Illuminators
While LED illuminators are popular for their efficiency, halogen bulbs still hold value in certain microscopy tasks. Halogen provides a more intense light, suitable for high-magnification applications, although they produce more heat and have a shorter lifespan.
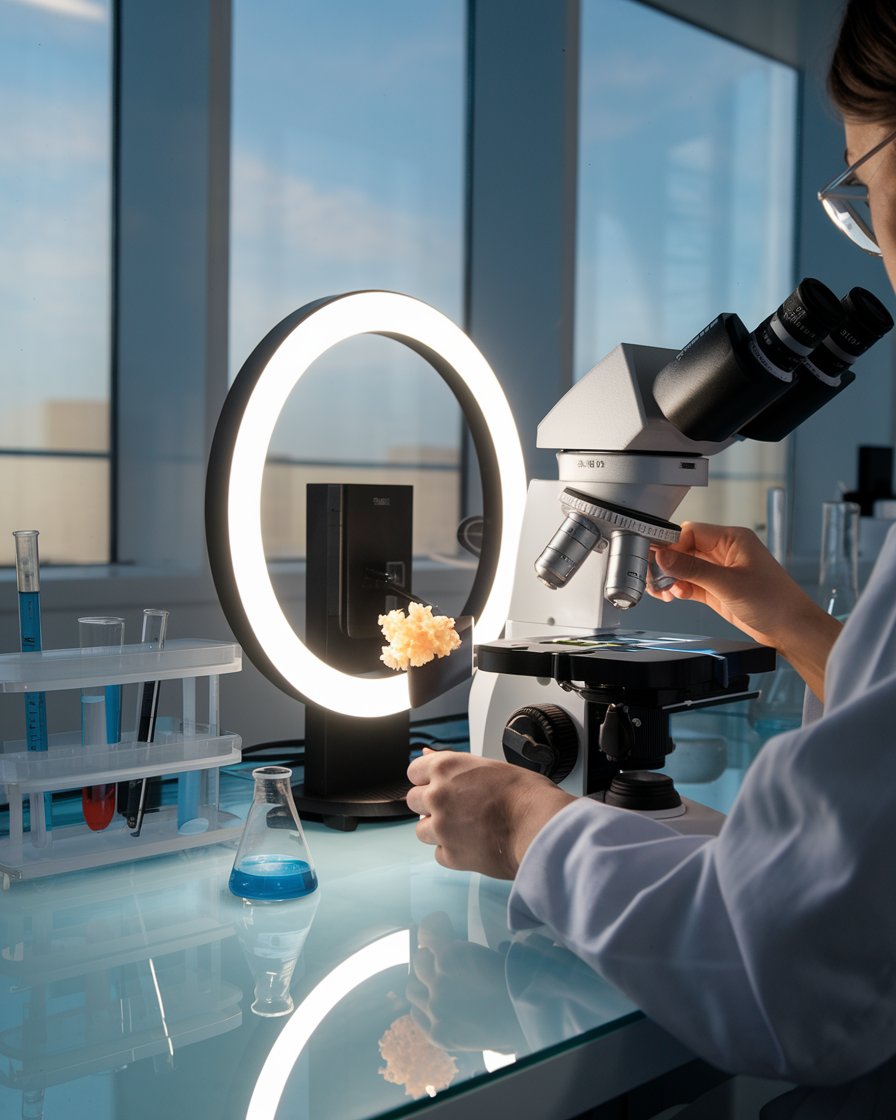
6. LED Ring Lights for Shadow-Free Illumination
LED ring lights are a common choice for providing shadow-free lighting, making them ideal for tasks like stereo microscopy. By surrounding the specimen with even light, they allow for better visibility and more accurate observations, which are crucial in fields like biological and industrial microscopy.
How a Microscope Illuminator Provides Proper Illumination
A microscope illuminator is crucial for providing clear, detailed views of specimens. By emitting a consistent light source, it ensures that the object under observation is well-lit, reducing shadows or dark spots. With the development of advanced lighting, modern illuminators are equipped with features like adjustable brightness and LED bulbs. These upgrades make microscopes even more efficient for both casual users and professionals, whether working with biological samples or industrial materials. Proper illumination is necessary for enhancing visual clarity, making a high-quality microscope illuminator a key tool in microscopy.
Different Types of Microscope Illuminators
Microscope illuminators come in various forms, each designed to suit different tasks. For example, halogen bulbs provide intense light, ideal for bright field microscopy, while LED illuminators are preferred for long-term usage due to their efficiency and low heat output. Some systems feature fiber optic illuminators, which allow flexible light positioning, making them useful in specialized scientific applications. Understanding the differences between these types ensures that users select the right illuminator for their needs.
How LED Ring Lights Enhance Microscope Use

LED ring lights are becoming a popular choice for microscope illumination. They offer consistent, shadow-free lighting that is critical for stereo microscopes and other applications where clarity is important. The ring light surrounds the lens, providing even illumination across the entire field of view. This lighting system is particularly useful in industrial and biological applications. With adjustable brightness, the LED ring light allows users to customize the intensity to suit different specimen types, making it a versatile option for various tasks in microscopy.
Case Study: LED Ring Lights in Medical Research Microscopy
In 2019, a medical research lab at a leading university implemented LED ring lights to improve the quality of imaging during critical cell analysis. Before the transition, the lab relied on traditional halogen bulbs that produced uneven illumination and excessive heat, affecting sensitive biological samples. The inconsistency in lighting often resulted in blurred images and a lack of clarity during high-precision tasks, such as fluorescence microscopy.
By switching to LED ring lights, the research team observed significant improvements. The shadow-free, even lighting provided by the LED rings enhanced specimen visibility, leading to more accurate and detailed observations. Additionally, the adjustable brightness allowed the researchers to tailor the light intensity to match specific sample requirements, reducing overexposure and improving image quality. The lab also noted reduced energy costs and longer operational hours, as the LED lights generated less heat and had a longer lifespan than halogen alternatives.
Why LED Ring Lights Are Ideal for Precision Work
LED ring lights have transformed how microscopes are used, particularly in tasks requiring high precision. These lights create an even, shadow-free environment around the specimen, which is perfect for tasks like fluorescence microscopy. The consistent light distribution reduces the risk of missing important details during observation. Moreover, LED ring lights consume less energy, making them both cost-effective and practical for labs or industrial settings. Their ability to maintain a consistent brightness level makes them indispensable in precision-focused tasks.
Advantages of LED Ring Lights Over Traditional Lighting
One major advantage of LED ring lights is their durability compared to older lighting methods. Traditional lighting, like halogen bulbs, often burns out quickly and produces significant heat, which can affect sensitive specimens. LED ring lights not only last longer but also generate minimal heat, protecting the specimen and keeping the working environment cool. These lights also allow for adjustable brightness, making it easy to switch between different tasks without changing the lighting setup.
Comparing Microscope Illuminator Types: LED vs. Halogen

When choosing a microscope illuminator, understanding the difference between LED and halogen illuminators is important. LED illuminators are energy-efficient, produce less heat, and have a longer life compared to traditional halogen bulbs. On the other hand, halogen illuminators often offer a more intense light, making them suitable for specific types of microscopy. Users need to balance the needs of their microscope and the tasks at hand when deciding which type of illuminator is best suited for their work.
LED Illuminators: Energy-Efficient and Low-Heat Option
LED illuminators have gained popularity in microscopy because they offer several benefits over traditional light sources. They consume significantly less energy, making them a cost-effective choice for laboratories. Additionally, LED systems produce minimal heat, reducing the risk of affecting sensitive specimens. These illuminators are also easy to use and provide adjustable brightness, allowing users to control the light level for different magnifications. The long life span of LED bulbs ensures that they last for many years, reducing the need for frequent replacements.
Halogen Illuminators: Best for Intense Light Needs
While LED illuminators are popular for their efficiency, halogen systems still hold an important place in microscopy. These illuminators provide a more intense light that can be useful in applications requiring high magnification or bright field microscopy. However, halogen bulbs tend to burn out more quickly and generate more heat, which can be a concern for long-term use. Understanding when to use halogen versus LED helps in choosing the right illuminator for specific tasks, ensuring accuracy and reliability.
Energy efficiency is doing more with less – and that’s exactly what LED lighting offers.” – Alex Steffen
The Importance of Adjustable Intensity in LED Ring Lights for Microscopes
One of the standout features of LED ring lights used in microscopes is their adjustable intensity. Being able to control the light intensity ensures that the ring light provides the exact brightness needed for each observation. This is particularly useful in scientific and medical settings where precision is critical. Whether it’s a biological specimen or an industrial material, adjusting the light intensity helps to prevent overexposure and ensures the best visual results. LED ring lights are now a standard feature in many microscope setups, thanks to their versatility.
Benefits of Controlling Light Intensity in LED Ring Lights
One of the biggest advantages of LED ring lights is their adjustable intensity feature. Being able to change the brightness level makes these lights adaptable to a variety of microscopy tasks. For instance, too much light may overexpose a specimen, making it difficult to see fine details, while too little light can obscure important features. With an adjustable LED ring light, users can find the perfect balance for clear observation. This flexibility is especially helpful in complex scientific studies, allowing for more precise and reliable results.
Applications of LED Ring Lights in Different Microscopy Fields
LED ring lights are highly versatile and find applications across multiple microscopy fields. In biological research, these lights provide the perfect illumination for studying live specimens. In industrial settings, the even lighting they offer makes it easier to inspect materials for quality control. Whether it’s for high-intensity tasks or general observation, the adjustable brightness of LED ring lights proves useful. This feature ensures that they remain a top choice for many different types of microscopes.
Conclusion
Microscope illumination is essential for achieving clear and accurate specimen observation, whether in scientific research or industrial applications. Modern LED light systems, such as LED fiber optic illuminators, provide consistent and bright lighting while consuming less power. They are equipped with features like variable intensity control and fluorescent ring lights, making them adaptable to different microscopy tasks. These systems also produce less heat compared to traditional halogen bulbs, making them a preferred choice for extended use.
In addition, advancements like coaxial illumination and dual LED lamps ensure even lighting distribution, which is crucial for high-precision tasks like fluorescence stereo microscopy. The ability to adjust light intensity with ease helps researchers fine-tune their setup for various specimen types, ensuring accurate results. Whether using a 150w light source or a more advanced diode system, proper illumination plays a vital role in ensuring the success of any microscopy project.
