Introduction
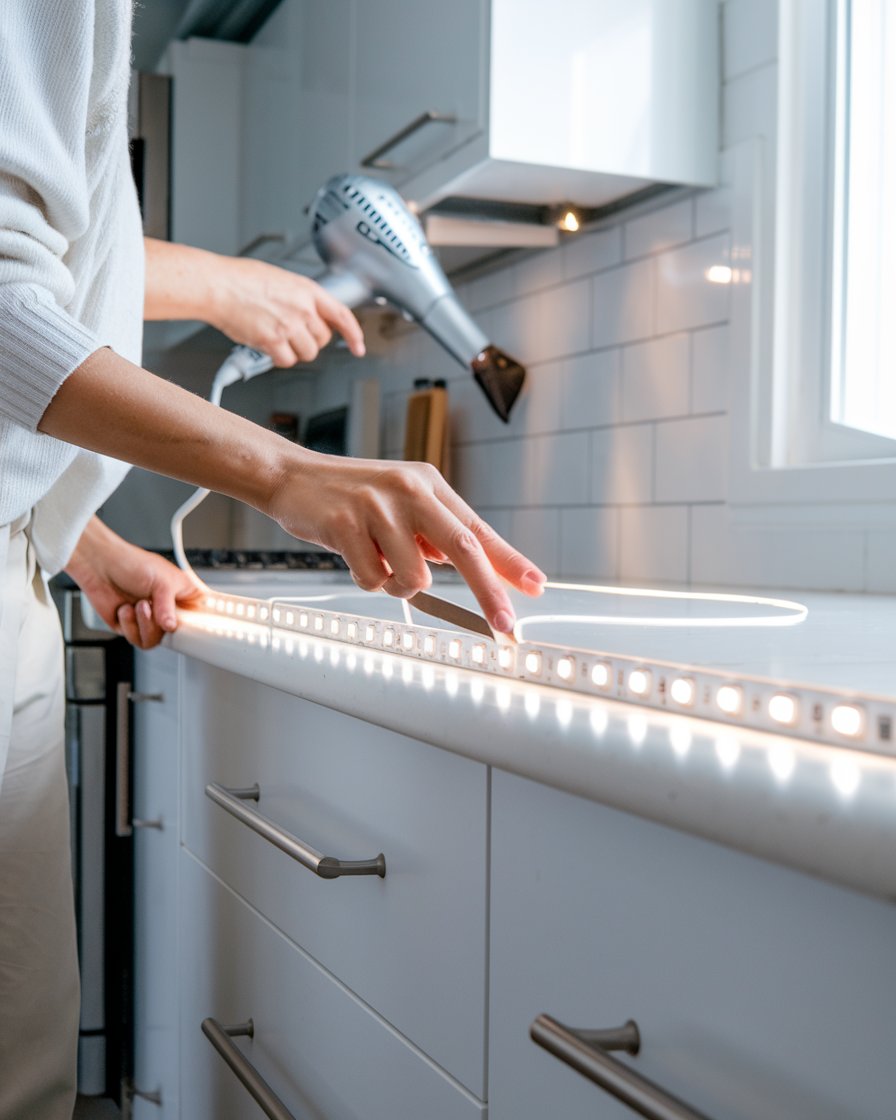
Reusing LED strip lights can be a practical way to save money while brightening your space. However, it’s important to follow the proper steps to remove and restick them without causing damage to the wall surface or the lights themselves. Whether you’re moving the lights to a new area or repositioning them, applying heat using a hair dryer helps loosen the adhesive, making it easier to peel off the LED strip lights. This approach also prevents leaving sticky residue behind, which can harm your wall paint or fixtures.
When resticking LED light strips, you’ll want to ensure the surface is clean and dry to create a strong bond. Proper removal techniques, such as slowly pulling the strip and avoiding sudden force, minimize the risk of damaging the strip or causing electric shock. Following these steps allows you to safely reuse LED lights while maintaining the integrity of both the lights and your walls.
Key Takeaways
- Applying heat with a hairdryer helps loosen the adhesive on LED strip lights, allowing for easy removal without damaging the surface.
- Cleaning the surface thoroughly and letting it dry completely ensures a strong bond when resticking the LED light strips.
- Replacing worn adhesive backing with new adhesive or command strips is crucial to maintain a secure hold when reusing LED strip lights.
- Peeling the strip slowly and using a flat object prevents damaging the LED strip or causing electric shock during removal.
- Removing sticky residue with a soft sponge and mild soap ensures the wall is clean and ready for reinstallation of the LED lights.
- Testing the adhesion before final installation guarantees that the strip light stays firmly in place for longer-lasting use.
How to Reuse LED Strip Lights Without Damaging the Surface

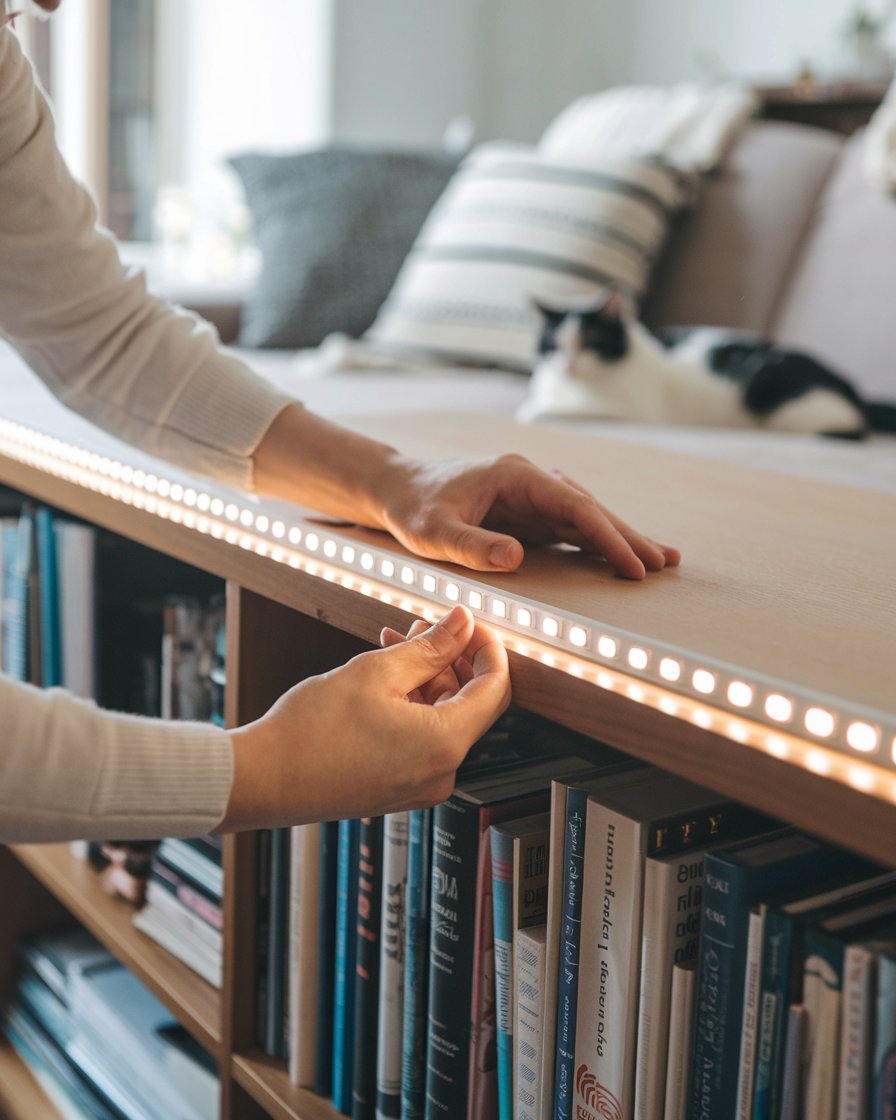
Reusing LED strip lights can be a cost-effective solution, but it’s essential to do so without damaging your wall surface. Start by carefully loosening the strip light from one end using a flat object. Applying medium heat along the length of the strip with a hairdryer helps soften the adhesive, allowing you to remove the strip without damaging the paint. Adhesive residue left behind can be removed using a soft sponge. Before resticking, clean the surface and allow it to dry completely to ensure the new adhesive sticks well. If reusing led strip lights, consider using new adhesive backing to create a strong bond.
Effective Steps to Reuse LED Strip Lights Safely
1. Use the Right Tools for Safe Removal
Begin by loosening the LED strip lights from one end using a flat, non-abrasive tool, such as a butter knife or plastic scraper. Avoid using sharp objects that could damage the wall or strip. This method reduces the risk of pulling paint or damaging the adhesive.
2. Apply Controlled Heat to Soften Adhesive
Using a hairdryer or heat gun set to medium heat can effectively soften the adhesive along the strip. Ensure that the heat is applied evenly to avoid overheating any sections, which could damage the LED lights or the wall surface. This makes the strip easier to remove without leaving residue.
3. Clean and Prep the Wall Before Resticking
After removing the strip, clean the wall using a soft sponge and mild detergent to remove any dust or adhesive residue. Ensure the surface is fully dry before reapplying the lights. This step is crucial for a strong bond when resticking LED light strips, preventing any unevenness.
4. Use Fresh Adhesive for a Strong Hold
If the original adhesive has worn out, consider using new adhesive backing or command strips specifically designed for LED lights. Apply the adhesive along the full length of the strip to ensure a secure hold on both smooth and textured surfaces. Press firmly to ensure the strip stays in place.
5. Test the Adhesion Before Final Installation
After resticking the LED lights, test the adhesion by gently pulling on one end to ensure it holds properly. If it easily detaches, consider applying more adhesive or pressing harder along the length. Proper adhesion testing helps prevent the strip from peeling off after installation.
Preparing the Wall for Reusing LED Strip Lights
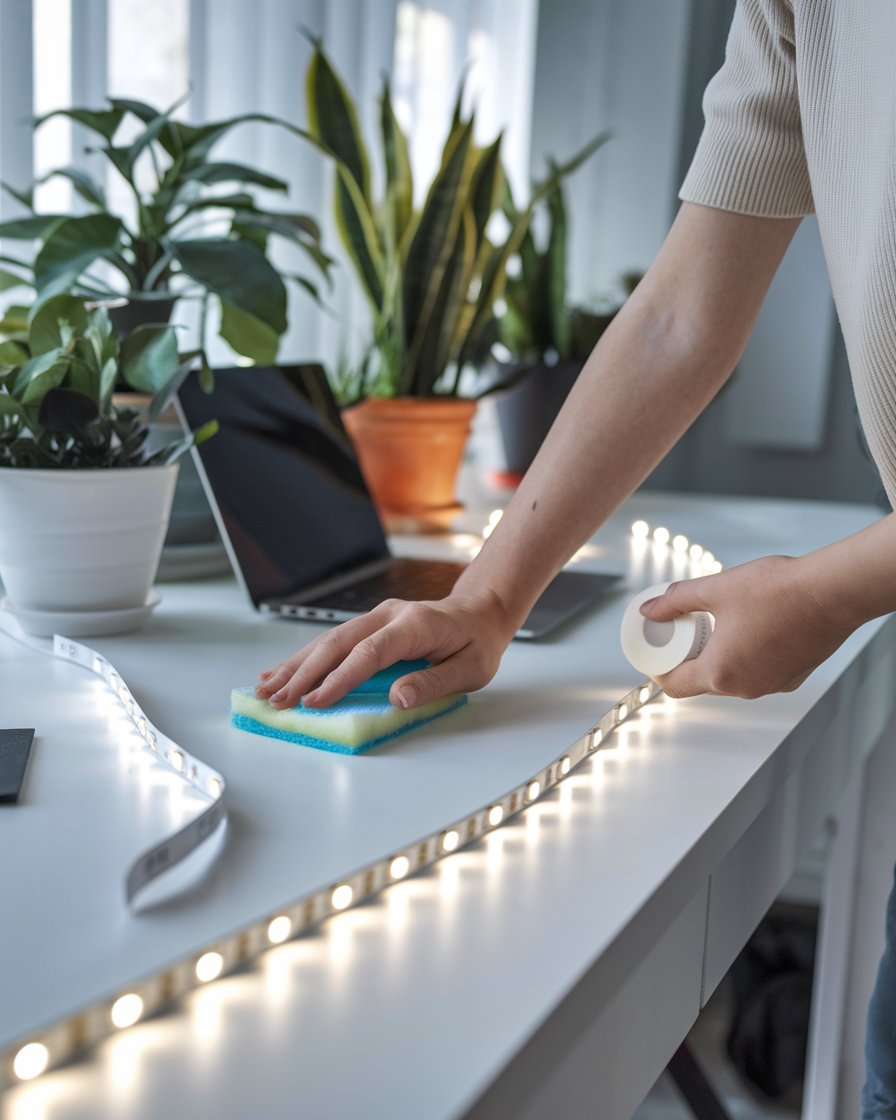
Before reusing your LED strip lights, it’s essential to properly prepare the surface. Start by cleaning the area with a soft sponge and mild detergent to remove any dust or grime. Make sure the surface is completely dry before reapplying the LED strip to ensure a strong bond. If there’s any adhesive residue left from the previous installation, it must be fully removed to prevent uneven sticking. Whether reusing LED lights on painted or smooth walls, ensuring a clean and dry surface will help the adhesive stick firmly and last longer.
Using New Adhesive Backing for LED Light Strips
If the original adhesive on your LED light strips has lost its stickiness, replacing it with new adhesive backing is crucial. Products like command strips or specialized LED strip light adhesives can help create a strong bond between the strip and the wall. Applying the new adhesive evenly across the length of the strip ensures that the lights remain securely in place. Reuse LED strip lights by carefully pressing the adhesive onto the wall without damaging the paint or the strip. This method provides a more reliable hold, even on textured surfaces.
Step-by-Step Guide to Safely Remove LED Light Strips
Removing LED light strips safely without damaging the wall requires careful attention. Start by peeling the LED strip lights gently from one end, using a flat object like a butter knife to loosen the strip. Heat the adhesive with a hairdryer or heat gun to make the removal easier. Take care not to pull too quickly, as this could damage the strip or wall surface. Use a soft sponge to wipe off any sticky residue left on the wall. By following these steps, you can safely remove LED light strips without causing any damage to the wall paint or strip itself.
Case Study: Safe Removal and Reuse of LED Strip Lights
In a 2023 case study conducted by home improvement experts, they explored the safe removal of LED light strips without damaging the wall surface, a common concern among homeowners. The study focused on following a structured method, beginning with unplugging the LED strip to prevent electric shock. The researchers applied medium heat using a hairdryer along the adhesive backing of the strip. This softened the adhesive, making it easier to peel off the strip without pulling off the wall paint.
The next step involved using a flat object, such as a butter knife or credit card, to gently lift one corner of the strip, then slowly moving along the entire length while maintaining heat application. Sticky residue left behind was cleaned using a soft sponge with warm water and mild soap. This process effectively allowed the participants to reuse their LED strip lights in a new location, minimizing damage to both the wall and the light strips.
Heating the Adhesive to Loosen LED Strips
When removing LED light strips, applying medium heat with a hairdryer or heat gun helps soften the adhesive backing, making it easier to peel the strip without damaging the surface. Start from one end of the strip, slowly loosening it while directing the heat along the length of the adhesive. Ensure the heat is moderate to avoid damaging the strip or the wall. This technique minimizes the chances of leaving sticky residue behind, ensuring the strip comes off smoothly. Properly heating the adhesive ensures a safer removal process.
Removing Sticky Residue After Taking Off LED Strips
After removing LED strips, sticky residue may be left on the wall. To clean this without causing damage, use a soft sponge soaked in warm water and mild soap. Gently scrub the area until the adhesive is fully removed. For tougher residue, consider using specialized cleaning solutions that won’t harm the wall paint. By thoroughly removing any leftover adhesive, you ensure that the wall is clean and ready for the next installation, whether you’re reusing the LED lights or applying new ones.
Resticking LED Light Strips: Ensuring a Strong Bond
After removing LED light strips, the process of resticking them to a new surface requires attention to detail. Clean the surface thoroughly to remove any dust and allow it to dry completely. The adhesive backing on LED strips may weaken over time, so it’s advisable to use new adhesive tape for a stronger bond. Once the surface is ready, press the strip firmly along the length to ensure it sticks securely. To avoid damaging the paint or strip, ensure the wall is clean and dry, and consider using command strips or additional adhesive if needed for reusing led strip lights.
Choosing the Right Adhesive for Resticking LED Strips
Choosing the right adhesive is essential when resticking LED strip lights. If the original adhesive backing is no longer effective, consider using strong adhesive tapes or command strips designed for LED lights. These options provide a firm hold while being easy to remove later if needed. Ensure the adhesive is applied evenly along the entire strip to avoid any sagging or loosening over time. A strong bond is key to keeping the LED strip lights in place, especially when installed on textured or porous surfaces.
Resticking LED Strips Without Damaging the Paint
To avoid damaging the paint when resticking LED light strips, it’s important to use adhesives that are safe for walls. Ensure the wall is clean, dry, and free of dust before applying the strip. Press the LED strip along its length with even pressure to secure it firmly. If the lights are placed on a painted surface, consider using command strips or other adhesives that won’t peel off the paint during removal. This allows you to restick LED strips multiple times without damaging the surface.
“Trust is the glue of life. It’s the most essential ingredient in effective communication. It’s the foundational principle that holds all relationships.” – Stephen Covey
Tips for Reusing LED Light Strips Effectively
To effectively reuse LED light strips, preparation is key. Ensure that the strip is carefully removed from its original surface without causing any damage. Heating the adhesive helps loosen the strip without leaving sticky residue behind. Before resticking, make sure the new wall surface is clean and free from dust. Press the LED light strip firmly to ensure it sticks well, and consider using additional adhesive if the original backing has lost its stickiness. By taking these steps, reusing LED light strips becomes a simple and effective process, extending the life of your lights.
Extending the Lifespan of Reused LED Light Strips
Reusing LED light strips is an excellent way to get more life out of your lights, but proper handling is crucial for durability. Start by gently removing the LED strip from its previous surface, taking care not to pull too hard, as this can damage the strip. If the adhesive backing has worn out, apply a fresh layer of adhesive before resticking the strip. Ensuring that the wall surface is clean and dry also helps extend the lifespan of the reused strip light, allowing you to enjoy your LED lights for much longer.
Testing the Adhesion Before Final Installation
Before fully resticking the LED light strip, it’s important to test the adhesion. After applying the adhesive backing and pressing the strip against the wall, gently pull on one end to see if it holds firmly. If it comes off easily, consider applying more adhesive or pressing harder to secure the strip. Testing the adhesion ensures that the strip light will stay in place without falling off over time. Properly securing the LED lights is key to reusing them effectively and maintaining their functionality.
Conclusion
Reusing and resticking LED light strips can be a straightforward process when done correctly. By carefully removing the LED strip lights using heat, you can ensure the adhesive softens, making it possible to remove without leaving sticky residue on the wall. Once removed, cleaning the surface thoroughly and allowing it to dry completely helps create a strong bond when resticking the lights. Whether using new adhesive or command strips, press firmly along the length of the strip to ensure it sticks well without damaging the paint.
Resticking LED light strips, like minger LED strip lights, requires attention to detail to avoid damaging the ends of the LED or the adhesive strip. With proper preparation and care, it’s possible to reuse LED light strips multiple times without affecting their performance. Following these steps ensures that your LED lights remain securely in place, extending their lifespan and maintaining their functionality on various surfaces.